Windows 7

You can also visit my other blog at www.softknowledge.wordpress.com

Tips and Tricks

You can also visit my other blog at www.softknowledge.wordpress.com

How To(s)

You can also visit my other blog at www.softknowledge.wordpress.com

Downloads

You can also visit my other blog at www.softknowledge.wordpress.com

Wallpapers

You can also visit my other blog at www.softknowledge.wordpress.com

Quote of the Day

Thursday, December 1, 2011

Command prompt to reveal Hidden Files


Command prompt to reveal Hidden Files

Some viruses leave behind nasty side effects, even when your antivirus program has cleaned the actual virus from your computer. If your desktop icons are missing and your C: drive appears blank, don’t panic — your files haven’t gone permanently AWOL. Common viruses, such as the Windows 7 Recovery virus, will hide your files in an attempt to coerce you into paying for the virus’s removal. When you view your desktop or click on your C: drive, it may appear that all of your files have been deleted, but they haven’t — the virus has simply hidden them. You can restore them easily using a simple command prompt trick that works in Windows XP, Vista and 7.

Click the Start button in the lower left corner of your task bar. Type cmd in the search box at the bottom of the menu and press Enter. If you’re using Windows XP, click Run and type cmd into the Run box.

Type attrib -s -h -r c:/*.* /s /d and press Enter to execute the command. The command prompt window should look like this after you’ve typed the command:


Allow the command to finish executing (it may take a few minutes). When it’s done, close the command prompt window and check your desktop — your files, hidden by the virus, have been restored. You can use the same trick to restore files the virus may have hidden on other drives, including removable storage such as flash drives and external hard drives; just change the drive letter in the command above to the drive letter of the storage device with the hidden files.

How to Zip

How to Zip

Say you have many files that all need to be e-mailed, but you don’t want to add them one by one and you don’t think all of them will be within the recipient’s e-mail size limits.

What do you do then ? Why zip ‘em up, of course!

So....here is how to do it in a flick of a second .........

Browse to the folder where the files you want to zip are at. Now highlight the files by either drawing a box around them or by holding the Ctrl key and selecting each of them. Once you have all of the ones you want to zip up highlighted, Right-Click one of them, go down to “Send to” and choose “Compressed (zipped) folder”.


Like magic, your highlighted files will appear in one convenient package. If you don’t like the name Windows gives your zipped folder, just rename it!

If you don’t want to use the built-in Windows zip utility, there are also third-party programs like WinZip and WinRar, that have more features, like the ability to set the compression size and file extension.

Saturday, November 26, 2011

Start Internet Explorer 9 in Private Mode

Start Internet Explorer 9 in Private Mode

For all you Internet Explorer 9 users out there, how would you like to learn a quick trick so that every time you start IE, it runs in Private mode right from the start ?

What we’re going to do is create a desktop shortcut for IE and set a switch to make it start in InPrivate mode. So, right-click on your desktop, select New and choose Shortcut.


Now, if you’re using a 32 bit version of Windows, copy this text and put it in the path box:

“C:\Program Files\Internet Explorer\iexplore.exe” -private


For those out there running 64 bit windows, you have to change it a bit. Use this line:

C:\Program Files (x86)\Internet Explorer\iexplore.exe -private


Notice that in both cases we put -private after the quoted path.

When you’re done, hit Next, give your shortcut a name and you’re good to go.

Note: if you get an error while inputting this path, you might have a different version of windows and should try the other path.

Auto-Complete commands in Win 7 Command Prompt

Auto-Complete commands in Win 7 Command Prompt

Did you know that there’s a way to auto complete a path or file name in the Windows 7 Command Prompt? 
 
Here’s how!

Open a Command Prompt by clicking Start, then typing cmd in the Search Box. Right Click the Command Prompt icon in the results that appear and select Run as Administrator.


In the Command Prompt window, type in the change directory command, like this:


Now hit the Tab key.


*Poof* -the path is completed!

If you keep pressing the Tab key, the Command Prompt will put forth the next applicable file or folder that’s consistent with what you’ve typed so far.
 
Note: This may not work if you don't open the prompt as Administrator

Wednesday, November 23, 2011

What are Pen Flicks in a Touch screen Laptop

What are Pen Flicks in a Touch screen Laptop

I think the reason people love touch screens is because of how natural the hand gestures feel. For example, to scroll down a document, it feels better to just swipe down instead of pressing a little arrow key. If you’re looking to bring some of these intuitive gestures to your Windows computer, then might I humbly recommend that you enable Pen flicks.

To utilize pen flicks, your computer must be touch screen, or your laptop’s trackpad must support gestures. If you have a graphics tablet, then that will also allow pen flicks as well.

Begin by pressing the Start button, and selecting Control Panel.

Select the Classic view, and double click Pen and Input Devices.


Now choose the Flicks tab, and check the box labeled Use flicks to perform common actions quickly and easily.


Now you have two options: the navigation flicks, or the navigational flicks with editing. I personally prefer the latter, as it allows me to copy and paste with ease. Choose the option that best suits you, and of course, you can always change this setting.

If you select Customize, you can hand select what action a flick in a certain direction will perform. If you’d like to add a custom keyboard shortcut, just select the add option. For example. I made it so that a downward flick will close the program using the keyboard shortcut Alt+F4.


Finally, one last setting I’d like to bring to your attention is the flick sensitivity. If you find that you have to repeat a gesture several times before Windows recognizes it, then you should make the sensitivity more relaxed. However, if you find gestures are occurring by accident, than you should move the slider to the precise setting.


I hope this setting makes your computer feel a little bit more natural. Enjoy!

Tuesday, November 22, 2011

Network problems and Command Prompt

Network problems and Command Prompt

You don’t have to be an IT expert to troubleshoot pesky network and Internet connection problems. All you need is the Command Prompt utility. Any computer users familiar with MS-DOS and Windows 3.1 recognize it. Well, that utility hasn’t gone away; it’s still around, just hidden in the background.

Here’s how to access it, and how to troubleshoot basic network problems from your computer.

Press the Windows key on your keyboard. Type the text cmd in the search box – in XP this is called “Run” – and press Enter.

Basic rule of troubleshooting: always start with the closest possible source. You need to check your own computer for network connectivity first. Type ping 127.0.0.1 and press Enter. Your Command Prompt window should look like this if your computer’s network card has no problems:


You’ve just sent four requests for dummy data to your computer’s “loopback” IP address and it (hopefully) replied to each one. An IP address is a unique tag for your computer that tells the server where to send data; the loopback address is used for testing your computer’s network card. If there were intermittent problems or if your card were completely non-functional, the ping would have experienced some loss.

The next step up the chain is your default gateway, which is in most cases the network router. Any data entering or exiting the network has to pass through the router. To diagnose the router, you need to ping its IP address. Type ipconfig at the command prompt and look for the entry next to “Default Gateway.”


Now, ping your router the same way you pinged the loopback address: type ping . In this example, you’re pinging the default gateway at 10.0.0.1. If the connection between your computer and the router is strong and stable, all four of your data packets should get a response. If not, your router has connectivity problems. As a note, wireless connections are prone to drop signal, so keep that in mind when working with a wireless router.


Let’s say you’ve tested your computer and router and that everything checks out, but you still can’t connect to a webpage. So, perform the ping test on it. Let’s use Yahoo! for an example:


Yahoo! works. Just to be sure, do another ping test, this time to Google:


Google’s homepage checks out. If you were able to ping two remote sites successfully, you don’t have a problem with your network or Internet connection.

What is 32 Bit and 64 Bit - Explained


What is 32 Bit and 64 Bit - Explained

In one context, 32-bit and 64-bit refers to how a CPU (computer processor) handles information. These terms also indicate the number of bits that comprise a single data element (for example, a pixel in an image). In that case, when dealing with resource hogging data like images, audio, or video, there is a distinct advantage to a 64-bit system. However, when writing emails or text documents, the benefits of 64-bit may be less apparent.

What is a bit?

A bit (short for binary digit) is the smallest unit of digital information, represented by either 0 or 1. Arranging a series of bits in sequence creates a binary math language that the processing chips can understand. As a result, CPUs are identified by their ability to process these sequences (32-bit or 64-bit). Eight consecutive bits in such a sequence equals a byte (short for binary term). Large numbers of bytes are then combined to create kilobytes, megabytes, gigabytes, terabytes, etc.

Not confusing enough?

The terms, 32-bit and 64-bit indicate the width of the registers, which are storage areas within the computer. The registers can contain either the address location in the computer memory where data is stored, or the data itself. All computer data is processed using information represented in these registers.

Each instruction (the most basic computer command) can process the number of bits indicated in the registers. So, a 64-bit machine processes a 64-bit width register with each instruction. Likewise, a 32-bit machine processes a 32-bit width register per instruction. While it would seem that a 64-bit processor would naturally be faster, the number of instructions executed per cycle (the fundamental unit of time measurement in a device) indicates actual processing speed, so that may not always be the case.

It’s the combination of hardware and software elements which make up the computer architecture that determines processing speed. This will be discussed in part two of this series, where we’ll take a more in-depth look at processors, memory, and how hardware and software interact to improve (or–if not correctly balanced–reduce) overall performance.

Speed

Processing speed, referred to as clock speed, is generally measured in megahertz (MHz) which amounts to one million cycles per second, or gigahertz (GHz) equaling one billion cycles per second.

A computer’s architecture is a significant contributor to that processing speed, so CPUs (computer processors) with the same clock speed may not perform functions at the same rate. While a fixed number of clock cycles is required for each command (instruction), a faster clock will execute more instructions per second, and the machine will perform those instructions more quickly.

However, clock cycles (or clock ticks), like so many other terms in this bewildering lexicon jungle, is a term with multiple meanings. On one hand, a clock cycle is as described above, the relative speed of a processor, but it also refers to the internal system clock, which always runs at 66 MHz (66 million clock ticks per second). So, more powerful CPUs can execute instructions more rapidly than their less sophisticated counterparts, while still displaying the same number of units per cycle.

Memory

While the clock speed of the CPU is the primary indicator of processing capability, RAM (Random-Access Memory) also plays a significant role in performance. When a CPU requests information from the hard drive, it’s put into RAM, where it can be accessed with greater efficiency. But, if the memory (RAM) isn’t sufficient, the information may have to be returned to the hard drive before the next request can be answered, thereby slowing overall performance.

Hardware and Software

Hardware and drivers (the software that controls the hardware) must match the device’s system type, and this should be a primary consideration when upgrading a 32-bit system.

What all this means is that, with each operation, 64-bit processors can handle bundles of information that are twice the size of those processed by 32-bit systems, and the speed at which these bundles are delivered is determined by the overall balance of system resources (RAM, processors, etc.). In researching this article, I was directed to an analogy of a two lane highway that had been converted to a four lane highway to relieve bottlenecks. But, while that’s a good comparison, the benefit is more than just a method of efficiently moving traffic. 64-bit is not just an increased amount of data per bundle, it’s also higher quality data, as images, audio, and video files comprised of 64-bit elements are richer, with more depth and texture, than those made up of 32-bit elements.

The next and final part of this article, How to Determine if a System is 64-Bit Capable, will explain how to tell whether a system is 32-bit or 64-bit, and whether upgrades are possible (or practical).

I hope this has been as enlightening to read as it was to write.

Sunday, November 20, 2011

Speed Up Google Chrome


Speed Up Google Chrome
Well Google lunched new version of Google chrome which is much faster and stable, You also loving it and it’s becoming your favorite browser as you simply loves it’s clean interface and speed of browsing. Here are some good tips which can improve your experience further and you will love this fantastic browser more than ever.
Just follow these tips and see how Chrome improves in performance -
Disables usage statistics of Google Chrome
This option is used to help in Development of Google chrome, It send your usage data to Google so that based on that they can further improve Chrome. But if you are worried about system performance you should disable it . To disable this go to tools menu > Options > Advanced and uncheck the check box which says Send usage data to Google….
Disable DNS Preload in Google Chrome
This will prevent Google chrome to keep DNS info in their cache. Most of time it is unnecessary if you have a good connection of  at least 256kbps or more. It is recommended only for slow dial up connection or Mobile users who actually spend a lot f time in DNS query during browsing.  to disable this select tools menu of Google Chrome and select “Options.” In the next window,  go to the “Advanced” tab and uncheck the “Use DNS preload ….”
Disable anti-phishing filter
If you are advanced web user and you know how a phishing site look like or you know how to prevent from them you can disable this option. But if you are not at all comfortable working without phishing filters or don;t want to take risk you should keep it as it is . Disabling this not only saves your CPU time but also save your Internet bandwidth.  This option can also be disabled from Tools Menu > Options > Advanced.
Removes navigational data regularly
All of the browsers cache the Navigation data and other info for faster access to web pages you frequently visit. But if your cache size is big or it contains very old pages which you hardly visit once or twice in a month it will start performing negative for you, as web pages will load faster but they Browsers perform worse when navigation data is saved. So it is important to remove navigational data  frequently. To delete this in Chrome, go to Tools menu and choose the option “Remove navigation data” and choose “Delete data for this period” and not the option “All”. So it will remove old data and will keep recent data do this once in a week at least.
Disable Useless function which we don’t use normally –
To options that are mentioned below you need to edit the properties of Chrome shortcut which you are using to start the browser. To Change it, right click on the Chrome icon and choose “Properties.” this will open a windows with the  “Shortcut” tab, in this tab there is a box called “Destination”. You have to change things in this box itself.
E.g. To disable Java box,
  • if  you are using Windows Vista it should go like this — : “C:Users\AppDataLocalGoogleChromeApplicationchrome.exe -disable-java”
  • and if you are using Windows XP: “C:Documents and Settings%username% Local SettingsApplication DataGoogleChrome.exe”
The options which we are adding after the full path of chrome can be used one after the other leaving a space between.   You don’t need to write the entire path every time you are using a new options. Here are the option which can be used -
Disable-dev-tools – This will disable Developers tool which is not used by a normal user for sure.
Disable-logging – This will disable looging of browser activity, This log files are useful only in case of Crash or Other error which prevent you from using browsers. if you are experiencing any such problem and need to know the reason you can enable this option. but in general you don’t need these log files. By disabling this you will certainly save CPU RAM and Hard disk space.
Disable-metrics-system – This option will disable gathering of Usage Statistics data. This is used by Google and we don’t need it any how so you can safely disable this option.
Disable-metrics-reporting – If you disabled Metrics system there is no point in keeping Metrics reporting On, as there won’t be any data to send across. Disable it for sure.
Disable-java – Java on the web is rarely used these days and it greatly slow downs your browsers performance. If you not running any online application which uses Java or Java Applets you can safely disable this feature. This will prevent you from playing number of Online Java Games though. (like Yahoo Games)
Disable-java script – This will disable all kinds of JavaScript from being run on the web pages you visit. This is not recommended at  all as most of the sites these days are using some kind of JavaScript, to display pages. By Disabling JavaScript you will not be able to  see these site properly and they will behave improprly. This is why disabling JavaScript is not recommended.
Disable-plugins – This will disable all plugins including Flash player and other media player. After applying this modification you won’t be able to see a lot of media sites properly including YouTube. If you understand impact of disabling this go ahead and do it otherwise don;t use this option.
Disable-images – This will disable all images on all Webpages you browse, if you are using low bandwidth conection like GPRS or Dial Up it will be very useful for you as it will save a lot of bandwidth for you. This will make your browser an text only browser. So be sure you need it that way before making these changes.

How to hide usernames in Windows 7


How to hide usernames in Windows 7

The login screen of Windows Vista and Windows 7 makes it very easy to see the user name of the last person that logged in. This may be fine on personal computers, but on shared computers, this could be a security threat. A potential intruder would only have to find out the password, which is very possible with the right software. To solve this problem, we have to change a value in the registry. Don’t worry; it is easier than it sounds. But before we change anything, it is best to make a backup of the registry.

Note: If you’re uncomfortable editing the Windows Registry do not attempt this tip.


1. Press [Windows Key] + R to bring up Run.

2. Type “regedit” (without quotes) into the text box and hit enter.


3. In the Registry Editor, click on File -> Export…


4. Enter “backup” (without quotes) as name and save the file to the desktop.


Now we can start editing the registry…

1. Press [Windows Key] + R to bring up Run.

2. Type “notepad” (without quotes) into the text box and hit enter.


3. Insert the following text into the document that opens up:

Windows Registry Editor Version 5.00
[HKEY_LOCAL_MACHINE\SOFTWARE\Microsoft\Windows\CurrentVersion\Policies\System]
“dontdisplaylastusername”=dword:1

4. Press Ctrl + S to save the document. As a name, type “loginscreen.reg” and save it on the desktop. (IMPORTANT: enter the name with quotes)


5. Go to your desktop and double click on “loginscreen.reg”. When you are asked if you want to allow the program to make changes, click “Yes”.

6. You can now delete the loginscreen.reg file and enjoy your secure PC!

To change your login screen back to the default setting, repeat the above steps with one small change. The line:

“dontdisplaylastusername”=dword:1

needs to be changed to:

“dontdisplaylastusername”=dword:0


Note: In case you didn’t know, the registry is the part of the computer that stores all its settings. Do not allow programs or files to make changes to the registry unless you know they are trustworthy. It is usually a good idea to make a backup of the registry before editing it. By doing that, you can restore the registry afterwards if anything goes wrong. You can restore the registry by simply double clicking on the exported file.

Facebook Login Notifications

Facebook Login Notifications

Hey, Facebook users – after a very long time I have again come to my place. My Blog. Was a bit busy settling my second career and with Facebook. But I am back now. Did you know that you can set up India's favourite social networking site to send you an e-mail or even a text message if anyone tries to access your account from a new device?

It’s great for that extra layer of security – and I highly recommend it!

Here’s how:

While logged in to Facebook, click the arrow next to your name, then Account Settings. 
 
 
Once at the Account Settings control panel click the security category off to the left, then click Edit. 
 
Now simply choose how you’d like to receive a notification when/if your account is accessed from a new/different computer. Click Save Changes when you’re finished!


Wednesday, May 11, 2011

Word 2007 - Draft View

Word 2007 - Draft View

If you’re using either Word 2007 or 2010 and preferred working in the Normal view, then you’re probably wondering what happened to it.

I’m sure you’ve investigated the View tab of the Ribbon and this is what you found:


While on the surface it seems that they’ve done away with the Normal view, the truth is that they just renamed it. Try the Draft view.

Feeling better?

Yeah, I though you might.

Of course the happiness will be short-lived when you save a file in the Draft view and then find that later it opens in the Print Layout view again.

After you’ve changed the view of each document you open to Draft for a few days, you’ll be tired of it and wonder why they created the Draft view if Word wasn’t going to keep the setting when it’s opened again at a later time.

Well we can stop wondering about the whys and still not give up on having things presented to our liking…

Microsoft has included in the program options a place to tell Word whether or not you prefer to allow documents to open in the Draft view.

If you like that view then you’ll want to allow it, and here’s how you can make Word do just that.

Begin in the Office Button / File tab and choose Options.

In the Options dialog box choose the Advanced category on the left


On the right scroll all the way down to the General section.

Locate and select the “Allow opening a document in Draft view” option.

Click OK.

When you next open a file that you saved in Draft view it will still be in Draft view.

Monday, May 9, 2011

Web Browser Navigation

Shift+Space Web Browser Navigation

Sounds like a cool new form of space travel, doesn’t it? Unfortunately, (or fortunately, depending on how you look at it) it’s just a trick to make navigating pages in your web browser a little easier.

So, instead of using the Page Up and Page Down keys all the way on the other side of your keyboard, do this:

Press your Space Bar to go a page down.

Press Shift+Space to go a page up.


Quick navigation, without traveling all over the place! Give it a try!

Get Connected with me

Get Connected with me


Here are few links to get connected with me


My FaceBook Page : http://adf.ly/1TX5p

My Blog : http://adf.ly/1TX1w


My WOrdpress Blog (Softknowledge) : http://adf.ly/1TX45


Mallabhum ( My Business): http://adf.ly/1TX3E


Adf.ly : http://adf.ly/?id=457859

Wednesday, May 4, 2011

Firefox 4.0 Safe Mode

Firefox 4.0 Safe Mode

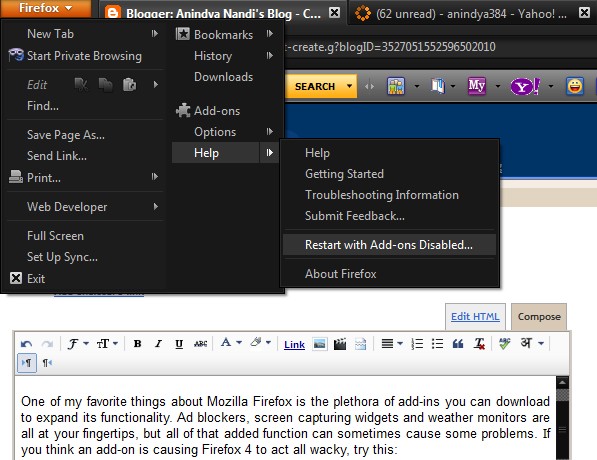
One of my favorite things about Mozilla Firefox is the plethora of add-ins you can download to expand its functionality. Ad blockers, screen capturing widgets and weather monitors are all at your fingertips, but all of that added function can sometimes cause some problems. If you think an add-on is causing Firefox 4 to act all wacky, try this:

Click the Firefox button and choose Help > Restart with Add-ons Disabled… .


Note: Make sure you’re clicking the little arrow next to Help, and not the button itself.

When the dialog box appears asking you if you want to disable add-ons pops up, click OK.


Now, before Firefox restarts another window will appear that gives you a list of options to fiddle with. Be extremely careful, because some of the options can have permanent effects (like deleting your bookmarks, as I painfully found out!). If you know what you’re doing, or have isolated the problem already, feel free to experiment, but for everyone else, click Continue in Safe Mode.


Firefox should then open up, uninhibited by any potential add-on problems, thus allowing you to carry on with your business until the add-on causing problems is fixed or removed.

Sunday, May 1, 2011

Successor of Windows 7 - Windows 8

Successor of Windows 7 - Windows 8


Windows 8 Milestone 1 is now available to download on torrents. Please note that this is not the Official version, its just a leak.

Developing of Windows 8 has jumped into a phase of Milestone 3. And Automatically led to even wave of new leaked screenshots of the system, which appear in the network and reveal newer features of the Windows 7 successor. In addition to the Aero Lite interface that was reveled before and now the website MSWin.me has published the pictures of the controls, which will go to lighter Aero theme of Windows 8.


Much more interesting feature that is included is the news about a module that is responsible for changing the language of the system. With this feature you are allowed to change language in Windows. Sources reveal the significant changes in the module. First Changing the language will be much simpler, and Microsoft company will enable this function at a fast location. Microsoft’s new window is expected in the next year. And the first beta version of Windows 8 is expected to be launched by end of this year.
 
Download Details (Search It from any torrent site and download)


File Name: 6.1.7850.0.winmain_win8m1.100922-1508_x86fre_client-enterprise_en-us.iso
Size: 2.45 GB (2,637,101,056 bytes)
SHA-1: DCA69DF6074BCA8B5DBA5C8D6D030D53CB6D82C
MD5: EA2DCFADA6BBA517A0A0649D15E1EB3D
CRC32: 32EB1881
 

Wednesday, April 27, 2011

Some Win Key Shortcuts for Windows 7 Users

Some Win Key Shortcuts for Windows 7 Users
 

Here are 11 beautiful shortcuts for Windows 7 users. Lets take a look: -
 
Win + Up Arrow – Maximize

Win + Down Arrow – Minimize

Win + Left Arrow – Snap to Left

Win + Right Arrow – Snap to Right (see a pattern here?)

Win + Home – Restore or minimize all other windows

Win + T – Press once to focus the first taskbar entry; press again to cycle through taskbar entries

Win + Space Bar (hold) – Peek at the desktop

Win + G – Bring gadgets forward to the top

Win + any number key (1-9) – Open a program on the taskbar. (The number corresponds to the pinned program’s location.)

Win + + (plug sign) – Zoom in

Win + - (minus sign) – Zoom Out

Friday, April 8, 2011

Microsoft Word 2007 - Review Tab

Microsoft Word 2007 - Review Tab

In Microsoft Word 2007, the Review Tab is useful in a lot of ways. You can have the Spelling and Grammar feature, the Research option, Thesaurus and Translation functionality to help you improve your documents. Here is what the Review Tab looks like.


Under the Proofing group, you can use find the Spelling and Grammar feature. You can easily check the spellings, punctuation errors and grammar using this tool. Here is the screen shot.


The first thing we are going to try is to check the spelling and grammar of a document. Go ahead and select the insertion point and click on spelling and grammar on the Proofing group on the Review Tab. This will start the Spelling and Grammar dialog box as shown below. Notice that it found an incorrectly spelled word, procedur. You can either click on Change if you would like to accept the suggestion made by Microsoft Word. Otherwise you can ignore it if you think the word is OK as it is.


Next we are going to try is the Research command on the word authentication as shown in the figure below. Select the word authentication and click on Research icon, this will launch the Dictionary feature as shown in the right side of the screen shot. It was able to find the word with the correct pronunciation and also the meaning for you to review. Very cool indeed!


Another related feature is the Thesaurus in Microsoft Word 2007. This amazing feature helps you find synonyms and also antonyms of any specific word. In our example it found a list of synonyms for authentication as shown on the right side in the figure below. I'm going to select certification and select insert. This helps if you are like me and use the same words over and over again.


In the next figure I have highlighted the Word Count feature. This lets you find the number of characters, paragraphs and lines in the document. This is a pretty useful feature if you are working on a term research paper where you have to stay within a certain number of words or pages.


If you are collaborating on a document with other team members or on a project report, the Comments feature in the Review tab in Microsoft Word 2007 can be a true lifesaver. In the following screen shot, I have added a comment that is shown in red. Notice that it used my initials and a number right before the actual comment. As the other team members and comments, the application will use different colors. This helps to keep all the comments organized from different authors.


Moving onto the next group section which is the Track changes group. We can easily manage additions, deletion, any comments and formatting changes in an efficient manner using this feature. You can find the Track Changes command under Tracking group in the Review Tab in Microsoft Word 2007.


Let us look at an example of this feature using a Course Syllabus sample. After the initial review, the changes are highlighted as shown below. The additions are in red and underlined, the deletions are in red and using a strike through. Furthermore notice that there is a vertical bar next to all the changes.


If you prefer seeing all the changes in Balloons, you can do this by selecting Show only Comments and Formatting in Balloons command. This will clean the document up and move the comments and changes to the right side in the markup area. The next two screen shots display the functionality of this feature.


If you would like to see all the changes in one place, you can use the Reviewing Pane command. In the image below, I have selected the Reviewing pane under the Tracking Group. Notice all the revisions are summarized on the left side of the document and broken down into insertions, deletions, etc. by the author and into different sections, very cool!


After all the changes have been reviewed and checked, we are ready to accept all the revisions. We can do just that by selecting Accept all Changes in Document under the Accept command in the Changes group under the Review tab in Microsoft Word 2007. This will go ahead and update the document then finalize all the revisions and changes.


As you can see the Review tab in Microsoft Word 2007 has a lot to offer us. OK at times, it is necessary to review different versions off the same document especially if there are several people working on it at the same time. In Microsoft Word 2007, this is just a breeze. You can also use the Compare feature to combine multiple versions of the same document.


Let us go ahead and see how this can be achieved. I'm going to compare two Course Syllabi that I have been working on for a class that I am teaching. I select the Compare command which launches a dialog box as shown below. I select the original document in the left side and the revised document on the right side and hit OK.


This will launch the wizard that will compare the two versions. Not only will it show all the differences between the two versions, but also display a summary on the left side as shown below and the screen shot.


The last thing I would like to show you is how to protect a document from editing. This option will restrict others from making certain types of editing or formatting changes to the document. You can select the Protect Document option under the Protect group. Here is the command shown on the ribbon in Microsoft Word 2007.


This will launch the Restrict Formatting and Editing dialog box as shown below. I will select the editing restrictions option that is number two and then click on us start forcing protection.


In the start enforcing production, I will select password, enter my password and click OK. There you go, now your document is protected by this password.


Next time someone tries to open this document and make changes, they will be prompted by this friendly on perfect document dialog box, pretty cool. A screen shot is as follows.