Windows 7

You can also visit my other blog at www.softknowledge.wordpress.com

Tips and Tricks

You can also visit my other blog at www.softknowledge.wordpress.com

How To(s)

You can also visit my other blog at www.softknowledge.wordpress.com

Downloads

You can also visit my other blog at www.softknowledge.wordpress.com

Wallpapers

You can also visit my other blog at www.softknowledge.wordpress.com

Quote of the Day

Showing posts with label Vista. Show all posts

Thursday, December 1, 2011

How to Zip

How to Zip

Say you have many files that all need to be e-mailed, but you don’t want to add them one by one and you don’t think all of them will be within the recipient’s e-mail size limits.

What do you do then ? Why zip ‘em up, of course!

So....here is how to do it in a flick of a second .........

Browse to the folder where the files you want to zip are at. Now highlight the files by either drawing a box around them or by holding the Ctrl key and selecting each of them. Once you have all of the ones you want to zip up highlighted, Right-Click one of them, go down to “Send to” and choose “Compressed (zipped) folder”.


Like magic, your highlighted files will appear in one convenient package. If you don’t like the name Windows gives your zipped folder, just rename it!

If you don’t want to use the built-in Windows zip utility, there are also third-party programs like WinZip and WinRar, that have more features, like the ability to set the compression size and file extension.

Monday, February 21, 2011

How to start up folders in Vista and Windows 7 with menu on the top

How to start up folders in Vista and Windows 7 with File, Edit, View, Tools, etc. on the top

Instead of this:


Wouldn't it be nice to have it like this?
Vista and Windows 7 has the “old” way of having the menu on top disabled by default, but it does let you enable it temporarily, if you would like.

When you have a folder open, press the Alt key and the menu will appear. Press Alt again and it will disappear.

Temporarily is fine, but here is how to do it so that the menu bar stays there:

First, open one of your Windows folders. I opened the User folder. To access it, go to your Start button and left-click. The Start menu will pop up; go up to the very top of the right pane where your name is (under the picture), and left-click on it.


Your user folder will pop up and the top-left of the folder will look something like this:


To enable the menu bar permanently (or until you want to change it back), left-click on Organize. On the drop-down menu, left-click on Layout. A new menu will pop up.


Okay, last step. Point your Cursor to Menu Bar (it's at the top of the menu) and left-click to put a check by it.


That's it! Now every time you open a folder in Windows, the menu bar will be there.

(Note: If you decide you want it disabled, just follow the above instructions, only when you get to Menu Bar, left-click on it to remove the check mark.)

Monday, August 16, 2010

How to Hide Control Pannel

How to Hide Control Pannel

If you share your computer with others, you know everyone loves to personalize their workspace. 

They change audio and video settings, add or remove programs and generally reconfigure the computer to better suit their taste. 

This isn’t a problem on a personal computer, but people have a tendency to change settings even on shared or public computers.
Therefore, if you are sharing your computer with other users, you need to be able to restrict the user’s ability to change crucial settings without limiting their access rights. 

The best way to make it clear you don't want people poking around your computer is to block their access to the Control Panel. 

The Control Panel is the portal to the operating system’s options and settings. By hiding it from the other users you can be assured that your computer will remain exactly how you configured it.

You can accomplish this easily in Windows XP, Vista and 7 with a simple Registry modification.

Warning! Before we go any further, I'd like to point out that messing around with the Windows Registry is not meant for beginners. Editing the Registry directly can have serious, unexpected consequences that can prevent the system from starting and require that you reinstall Windows. If you feel you do not understand or are unable to perform the steps below, please seek expert advice.

In addition, I recommend backing up the Registry before attempting any modification.

To back up the entire Registry in any Windows version, open the Registry Editor (see instructions below), click on the My Computer (or Computer for Vista and 7) key at the top and select File in the top left corner of the window. In the File menu select Export…, give it a name like registry backup and choose a safe location to save your file.

If something does go wrong while editing, you can restore the Registry by navigating to where you saved the .reg file and simply double-click on it. 

Now that you have backed up the Registry, we can proceed with the rest of the article.

To change a Registry setting we must first open the Registry Editor.


Go to the Start Menu and click on the Run command, situated above the Turn off Computer button. Then type the command regedit in the Open box and click the OK button.

To access the Registry in Windows Vista and Windows 7 you must log in with an administrator account.

Alternatively, type regedit in the search bar of the start menu, right-click on regedit.exe and selectRun as administrator.

The Registry Editor will now open.

The setting we need to change is located in the Registry structure, at the following address:

HKEY_CURRENT_USER\Software\Microsoft\Windows\CurrentVersion\Explorer\Advanced

Click the plus sign next to HKEY_CURRENT_USER and scroll down the list until you locate Software.

Then click the plus sign next to Software and look for Microsoft.

Then click the plus sign next to Microsoft and look for Windows.

Then click the plus sign next to Windows and look for CurrentVersion.

Then click the plus sign next to CurrentVersion and look for Explorer.

Finally, click the plus sign next to Explorer and left-click on Advanced.


With the Advanced key selected, right-click on an empty spot on the right side of the Registry Editor window.

Click New, and from the menu, select and click on DWORD Value.

If you have Windows Vista or 7, click on DWORD Value (32-bit).

Then, type Start_ShowControlPanel and press Enter from the keyboard.

Next, right-click on the Start_ShowControlPanel value and from the menu select Modify.


Under the Value Data field, type 0 (zero) and click OK.

Now, close the Registry Editor by clicking File, then Exit from the menu, and restart your computer.


After the restart, if you look under the Start menu, you will not see the Control Panel entry anymore.

Of course, you can always bring back the Control Panel if you want to make a change or remove a program.

Just follow the steps above until you reach the Start_ShowControlPanel value, double-click it and change the Value Data field to a 1 (or just delete the value).

Note: The Control Panel is not removed or uninstalled from your computer, it is only hidden. Therefore, any user that has administrator rights and knows where the Registry entry is located can make the Control Panel visible again.

Tuesday, March 30, 2010

Additional Clock in Windows Vista

Additional Clock in Windows Vista


Do you have a need for an additional clock on your desktop? Maybe you have a son or daughter in the service overseas, or perhaps relatives living in Europe? It's always good to know what time it is where they are, so you're not calling them at 3 o'clock in the morning and disrupting their rest. So, let's learn how to pin another clock up today!

1.) Right-click on your clock in the taskbar and select Adjust Date/Time
2.) Click the Additional Clocks Tab
3.) Check Show This Clock to add a clock (you can add one or both, by the way)
image
4.)Select the time zone you want.5.)Enter a display name for your new clock and click OK.
image

Wednesday, March 17, 2010

Creating Bootable Recovery-CD

Creating Bootable Recovery-CD

Besides a bootable floppy disk, a bootable CD-ROM can be of great help in certain situations. Especially if you don't have a floppy drive, you have to rely on a bootable CD-ROM to be able to fix some problems. Depending on what task you want to achieve, you need a different bootable CD-ROM. This page provides you the rough information what bootable CD-ROM's would be suitable for you and where to download them. Please experiment with those,..... at your own risk of course.
Bootable MS-DOS CD-ROM

If you were able to create a bootable MS-DOS floppy disk, then you can use this floppy as an image for a bootable MS-DOS CD-ROM. With a burning utility like Nero you can choose for a bootable data disk with the floppy as boot image. If you don't have a floppy drive, you will have to do this on another computer. Of course you can provide the floppy disk and/or CD-ROM with the necessary tools. Notice that the burned CD-ROM appears to be empty, the data has been put on the boot sector. If you boot from this CD-ROM, a virtual drive A: will be created. Only if you provided the floppy with CD-ROM drivers, the CD-ROM drives will be available as well.

NOTE: this procedure makes it possible to create a bootable system backup CD-ROM (needed if you don't have a floppy drive).

Bart's PE (Windows XP on CD-ROM)

Bart's PE (Preinstalled Environment, download: www.nu2.nu/pebuilder) makes it possible to create your own Windows XP environmental, bootable from CD-ROM . With Bart's PE you can access partitions, even if your own XP doesn't boot anymore. This is the perfect tool to restore your data as described earlier, if your own system is not accessible anymore. Because Bart's PE is Windows XP based, all external storage disks (like USB stick or external hard disk) are accessible without installing any drivers. It takes some time to create your perfect Bart's PE, but it's worth the effort. This tool offers many possibilities like: adobe reader, internet access, file recovery, CD-burning and many others plug-ins are available. Visit the page about building the bootable BartPE CD/DVD for more information.

VistaPE

VistaPE is a Windows Vista based Preinstalled Environment, which offers some advantages compared to BartPE (especially the support for SATA- and RAID controllers). Building VistaPE (download:www.vistape.net) is similar to BartPE, but most importantly: it is easier. Do you own a Windows Vista installation DVD? Just try to build a bootable CD/DVD with VistaPE, the procedure is quite simple! Visit the page about building the bootable VistaPE CD/DVD for more information.

Ultimate Boot CD

The Ultimate Boot CD (download: www.ultimatebootcd.com) is one of the bootable CD's which must be within reach in case of troubles. The CD contains multiple useful system tools (visit the website for an overview). This CD (especially the powerful tool TestDisk) was very useful to me saving valuable data from an inaccessible hard disk (because of a corrupted partition table caused by a multi boot system with Linux). A new variant on this CD is the Ultimate Boot CD for Windows (download: www.ubcd4win.com).

System Rescue CD (Linux)

System Rescue CD (download: www.sysresccd.org) offers you an extended Linux based bootable CD-ROM. This CD-ROM contains some interesting tools:
  • AIDA: with this tool it's possible to analyze your available hardware.
  • MemTest: with this utility you are able to test your memory.
  • GParted: partitioning software to partition your hard disk (if you don't have Paragon Partition Manageravailable).
  • Partimage: for creating an image of one of the partitions.

MemTest86+

A BSOD (Blue Screen Of Death) with different error messages frequently popups? This might be caused by a failure of the RAM-memory. Make sure there is nothing wrong with the RAM-memory and test it with the bootable CD MemTest86+ (download: www.memtest.org/#downiso).

GParted Live CD/Parted Magic (Gnome Partition Editor)

If you would like to experiment with a new operating system (keeping your current operating system), then it's necessary to create more then one partition. If you don't like to pay for partitioning software (like the out of date Partition Magic or Paragon Partition Manager), use one of the free partition managers GParted Live CD (download: http://gparted.sourceforge.net/livecd.php) or Parted Magic (download:http://partedmagic.com). These partition manager (based on Linux) have the advantage to be able to resize NTFS-partitions (Windows Vista partitions included!) without loosing data. Unfortunately, they don't function on all systems because the hardware is not always supported correctly.

Offline NT Password & Registry Editor

Changing the password from one of the user accounts can also be done with the bootable CD Offline NT Password & Registry Editor. You can find this CD on home.eunet.no/~pnordahl/ntpasswd.

Knoppix (Linux)

Would you like to try Linux safely? Try Knoppix (download: www.knoppix.org), a bootable Linux CD-ROM. Remember: don't mess with the partitions on your hard disk.


Tuesday, March 16, 2010

Use 4 GB RAM in 32 Bit XP or Vista

Use 4 GB RAM in 32 Bit XP or Vista

Recently one of my friend bought 2 GB RAM for his PC. He already had 2GB installed and he added more 2GB to his desktop computer.But his XP showed only 2 GB RAM. This is very common problem.By default Windows XP supports only 2GB of RAM on 32-bit systems.It is fact that 64-bit systems can support 4 GB of RAM .But very few people know that even 32-bit systems can support up to 4GB of RAM.This can be done by enabling the PAE(Physical Address Extension) on your PC.Now-a-days almost all processors support PAE.

How to enable PAE on XP:

To enable PAE in Windows XP you have to edit the boot.ini file. Open boot.ini file. It will be there in your system drive. Suppose your OS is installed in C drive then go to run and type c:\boot.ini and hit enter.Add “/ PAE” at the end of the file (without quotes).

It would look something like this:

multi (0) disk (0) rdisk (1) partition (1) \ WINDOWS = “Microsoft Windows XP Professional” / noexecute = OptIn / fastdetect / PAE
Don’t change anything else in boot.ini or your PC will not boot.Just add / PAE at the end of the line.

Now restart your PC and check if your computer is showing 4 GB RAM. To do this right click on My computer and select properties.Click on general tab and see if it is showing 4GB or not. If it shows then it means that you have done everything correctly and you can use complete 4Gb of your RAM.

Enable PAE under Vista:
It is very easy to enable PAE under Vista. Open cmd and type

BCDEdit / set PAE forceenable  and press enter

Now it should show 4GB of RAM in Vista.

Warning:   Use PAE only if you really have 4GB of RAM or your PC may not work properly.

Monday, March 15, 2010

The Security Center, Windows Update and the Network and Sharing Center


The Security Center, Windows Update and the Network and Sharing Center

The functionality of the Windows Vista Security Center (available in the Control Panel) has been increased with a (more) advanced firewall, an improved Windows Update, Windows Defender to prevent the installation of spyware, User Account Control and the supervision of the security settings of the internet connection. This makes the Security Center the place for changes in the settings concerning many security issues. In addition to the Security center, the Network center (available in the Control Panel as well) has been added to Windows Vista. The Network and Sharing Center describes the security settings for the visibility of the computer in the local network and the settings for sharing of files and printers with other computers in the network. Both the Security Center and the Network and Sharing Center are described on this page.

The Security Center
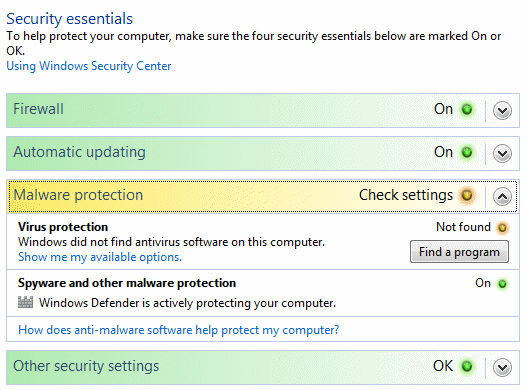
By default, Windows Vista does not contain virus scan software. That is the reason why the Security Center shows an orange colored shield in the system tray with the warning message that Windows is not sufficiently protected against viruses. This message also shows up when Windows does not recognize the installed anti virus software. If the security reaches a lower level in comparison to the default security levels, the Security Center comes up with a warning by showing an orange or even red colored shield in the system tray.

Disabling the Security center messages
If those warning messages are needless, disable them in the Security center, Change the way Security Center alerts me (at the left in the task pane), activate the option Don't notify me and don't display the icon (not recommended). Disabling the service Security Center (which does not affect the installed security tools and settings) is more drastic, but does also solves this issue. In both cases, the Security Center will not show any alert messages anymore about the security issues.

Security Center: essential security settings

TIP: There are multiple free virus scan software available for Windows Vista, like AVG Anti-Virus, AntiVir and AVAST. All are recognized by the Security Center.

Windows Vista Update
After the setup of Windows Vista has been finished and the internet connection is established, Windows Update checks whether there are essential updates for Windows and the hardware. Manually checking for updates is easy with the option Windows Update situated in the Control Panel. The Windows Updatefunction is not web based anymore (like the previous Windows versions), but integrated in the Windows software which results in a much faster update function. Checking for updates can be done for Windows only, but also for other Microsoft products (like MS Office). For the most enhanced consumer version (Windows Vista Ultimate) there are also Windows Ultimate Extras available, but the number offered is still astonishing low.
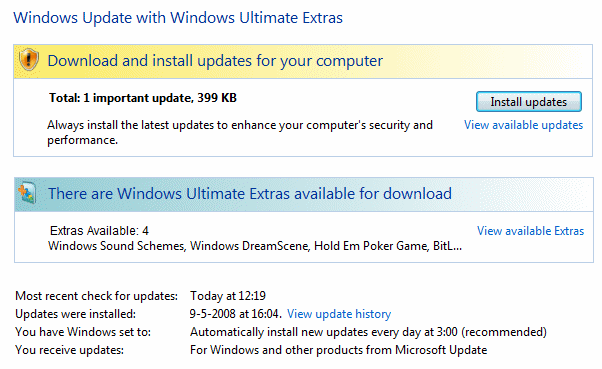
Downloading and installing Windows Updates

The button Install Updates will install the presented essential updates immediately. The option View available updates shows the optional updates. If an update must be ignored for any reason, hide the update by right clicking it and to select Hide update (restoring hidden updates is done by the optionRestore hidden updates in the task pane).

The option Change settings makes it possible to change the frequency, exact time and the type of updates. By default, all updates (optional and Microsoft updates included) are downloaded and automatically installed. If there are essential updates available, a shield will show up in both the taskbar and the on/off button in the Start menu. This indicates that the available updates will install automatically at shutdown. It is only advised to change those settings if the internet connection is slow or if the update of Microsoft software is not desirable.
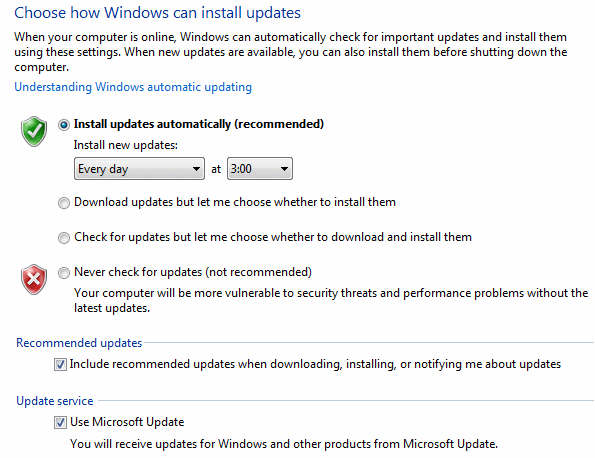
Installing Windows updates

TIP:  For some updates, Windows asks the user to reboot the computer to finish the installation of the update. When there is still a user logged on, a reboot is not always desired. The automatic rebooting of Windows can be disabled by a change in the registry, in which case the update will be installed at the next boot. This is done by adding a new DWORD value NoAutoRebootWithLoggedOnUsers with the value 1in the registry key HKLM\SOFTWARE\Policies\Microsoft\Windows\WindowsUpdate\AU.

Windows Vista Service Pack 1 and 2
Service Pack 1 and 2 for Windows Vista can be downloaded and installed automatically using Windows Update. Before Service Pack 2 can be installed, it is necessary to install Service Pack 1 first (so the latest service pack doesn't install the previous service pack!). Both service packs can be downloaded as stand alone installation pack in the Microsoft's Download Center, which are especially useful in case the service packs have to be installed on multiple computers (to save time downloading the service packs multiple times through Windows Update). Of both service packs there are two versions available: the 32-bits version and the 64-bits version (the downloads are quite large because this Service Pack can be used for all Windows Vista languages):

Service Pack 1 (32-bits): www.microsoft.com
Service Pack 2 (32-bits): www.microsoft.com
Service Pack 1 (64-bits): www.microsoft.com
Service Pack 2 (64-bits): www.microsoft.com

ATTENTION: Disable the virusscan software before installing the service packs.

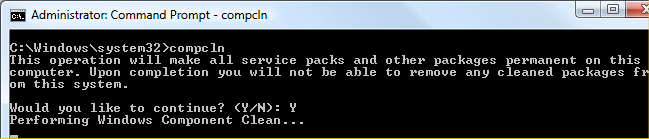
When the installation of both SP1 and SP2 are finished and working properly, then the files to undo the installation of the service packs can be deleted to saves a few Gb's of disk space! Deleting these files is done with the command COMPCLN (enter this command in the area Start Search of the Start Menu) followed by the Y-key to confirm the definitive deletion of the undo-files of Service Pack 1 and Service Pack 2. Attention: COMPCLN is only available after installing Service Pack 2 replacing the cleanup tool VSP1CLNfrom Service Pack 1.


Deleting the update files
By default, Windows Update stores the update files in the folder C:\Windows\SoftwareDistribution. In time, Windows Update will download and install many updates. Because the downloaded update files won’t be removed after installation, this folder keeps growing. By deleting the already installed update files, a lot of hard disk space will become available for other purposes. This can be done by deleting the folderSoftwareDistribution (files included), which can only be done by first disabling the service Windows Update. Right click the service Windows Update (see the page Windows Services) and select Stop. The folder C:\Windows\SoftwareDistribution can be deleted a few seconds later. The update history (see the screen dump) will be deleted as well, but that causes no problem. Restart the service and Windows will recreate the deleted folder. The only thing left to do is to enable the option to update other Microsoft products at the bottom of the Windows Update-page (if Windows comes up with an errormessage, disableUser Account Control temporarely at the moment the errormessage takes place to fix this problem permanently).
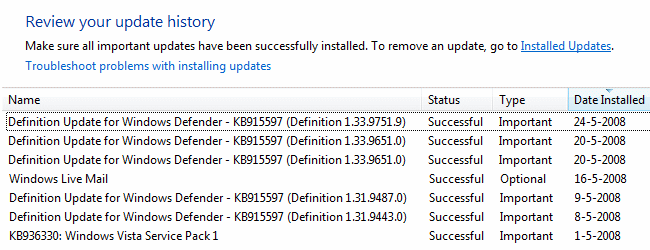
Installed Windows updates

Solving Windows Update problems

Problems with Windows Update are quite common: already installed updates keep coming back after a restart or Windows Update shows an error message and refuses to go on. Many of these problems can be solved easily by resetting Windows Update! This will delete the update installation files and the update history and restore the update function.

Resetting Windows Update
Before resetting Windows Update, it is necessary to stop the service Windows update temporarily, therefore right click this service and choose Stop. The next step is to delete the (content of) folderC:\Windows\SoftwareDistribution (which contain the update history and downloaded updates) using the Windows Explorer. Although it is not necessary, this folder can be used as back-up by simply renaming it toSoftwareDistributionOrg (in stead of deleting the folder). After the folder SoftwareDistribution has been renamed or deleted, the service Windows update can be started again by right clicking it and to choose for Start. By manually starting the search for updates, one can verify whether the update function works properly now (if that is the case, the folder SoftwareDistributionOrg can be deleted). If Microsoft Update was used before (for the automatic installation of updates for all Microsoft products), then it has te be activated again.

TIP: If resetting Windows Update didn't help, resetting the Internet Explorer settings might do the job (Tools, Internet Options, tab Advanced, button Reset). After resetting Internet Explorer it is necessary to change the set homepage and to change some settings. If there is still a problem with Windows Updateafter deleting this folder, make sure the service Windows Modules Installer is enabled.

Repair Tool for Windows Update
If resetting Windows Update didn't work or do you rather use a tool which does it for you automatically? One can also use a repair tool which has been send by e-mail to one of my readers by the Microsoft helpdesk. This tool isn't available for download (yet) at the Microsoft website, probably because it is still under development. But in case the above procedure doesn't work, it seems to be the only thing that still can help solve problems with Windows Update. Download the repair tool (download), unzip it and start the CMD-file with additional administrator rights by right clicking it and to choose for Run as administrator. After running this tool, make sure Windows Update is working properly now by manually checking for updates. Although I'm convinced the tool work properly, the use is at your own risk! For Windows XP there is a similar tool available to repair Windows XP Update.

Windows Firewall
The Windows Firewall settings can be changed by the option Windows Firewall of the Control Panel. The firewall doesn't control the networkconnections individually anymore (like Windows XP does) but verifies the incoming traffice of all the networkconnections together. The tab Exceptions (available through the option Change settings) makes it possible to change the settings (to allow or to block) for some programs individually. The more advanced Windows Firewall settings can be changed by the shortcutAdministrative Tools of the Control Panel, Windows Firewall with advanced Security. The Windows Firewall can be disabled by deactivating the service Windows Firewall, but only do this if you have secured your internetconnection with firewall software (in most cases the Windows Firewall is disabled automatically by a newly installed alternative firewall.

Windows Defender
Windows Defender (new in Windows Vista) offers some additional security against spyware and other malicious software. If other security tools have been installed (or if you don't like it...), Windows Defendercan be disabled. To do this, disable the service Windows Defender and deactivate the program on the tabStartup of the systemconfigurationtool MSCONFIG.

The Network and Sharing Center
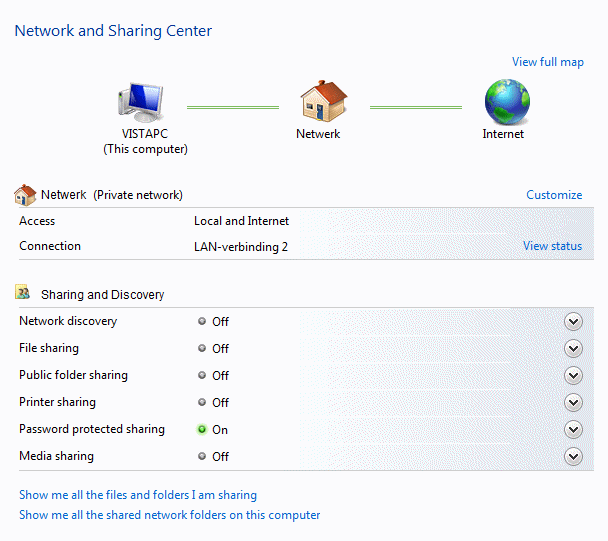
The Network and Sharing Center (available in the control panel) is the place to be to check the status, analyze and solve problems concerning the network. The Network and Sharing Center has settings for sharing files, printers and public folders. If there is no need to share files over the network, most options can be disabled (as shown in the screen dump) to raise the security level.
Network Center

The link View computers and devices (at the left in the task pane) makes it possible to browse with the Windows Explorer quickly through the network. This will show the connected router (but not the modem connected to the router), the shared (public) folders/files and the shared printers of the computers connected to the same network. Right click the hardware (modem, router) and select View device webpage to open the managementpage. There is no need anymore to type the IP-address into the addressbar of the Internet Explorer.

Sunday, March 7, 2010

Installing Windows Vista: Setup Procedure

Installing Windows Vista: Setup Procedure

The setup procedure of Windows Vista is easy. After booting the computer from the bootable DVD, you are asked for confirmation to boot from the Windows Vista DVD. For an upgrade to Windows Vista, the setup can also be run in a Windows XP environment (an upgrade installation). Windows Vista will be installed next to the current XP installation (before starting this procedure, remove the currently installed security software!). After the setup of Windows Vista has completed, programs, settings and personal data will be transferred automatically to the new operating system and the old system files will be moved to the folder Windows.old.

A clean installation is the best option!

An upgrade installation will probably run without any problems, but it's not the best way to install Windows Vista. An upgrade installation can possibly result in installation errors, a clean install (where Windows Vista is installed on an empty C: partition) probably won't. That's one of the reasons why a clean installation is preferred above an upgrade installation.

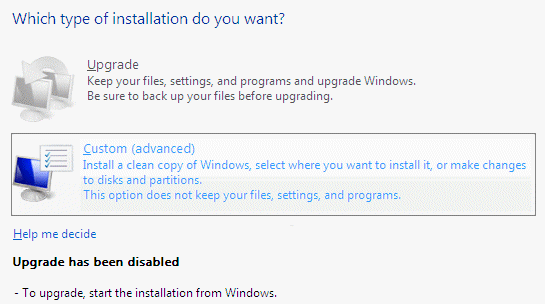
 An upgrade installation of a already installed Windows Vista

Multiboot system

For realizing a multiboot system, it is necessary to create multiple primary partitions, one for each operating system (in combination with a boot manager). Make sure you created a back-up of your personal data, hide the currently installed operating systems and remove an earlier installed boot manager before starting the setup of Windows Vista .

http://www.optimizingpc.com/i/m/leeg.gif

What if the computer doesn't Boot from DVD .....

If it's 'not possible' to boot the computer from the Windows Vista DVD, the boot order needs to be changed in the BIOS (in most cases the DEL-key must be pressed while booting the computer, to get access to the BIOS). Look for something like boot order or boot sequence. Change the boot order and make sure the DVD player will be the first boot device (before the hard disk does). If the setup has finished, the boot order can be restored to the previous settings.
http://www.optimizingpc.com/i/m/leeg.gif

http://www.optimizingpc.com/i/m/leeg.gif

Choosing between a 32 or 64 bit Installation.....

Windows Vista can be installed in both 32-bit (like Windows XP) and 64-bit. The 64-bit version should be more stable (and faster) because this version only allows the installation of 64-bit drivers which are signed by Microsoft. However, in practice, 64-bit version is not more stable in comparison to the 32-bit version. Besides, many drivers are not available and signed (yet) for the 64-bit version. Only choose for the 64-bit version if you are sure 64-btis drivers are available for your hardware and your software works error free. You will only know if this is true, just by trial and error (by setting up a multiboot system with the 32-bit and 64-bit you are able to compare the advantages and disadvantages of both versions). Attention: the older 16-bit software can't be used anymore in the 64-bit version!
http://www.optimizingpc.com/i/m/leeg.gif

The Windows Vista setup procedure

At setup, Windows Vista will try to install all the drivers of the connected hardware. Because many devices need to be installed separately, it is wise to disconnect the hardware before starting the setup procedure. The problems caused by installing hardware drivers are easier to back trace, if they are installed separately. After the setup has finished, reconnect the hardware one by one and install the accompanying drivers and software.

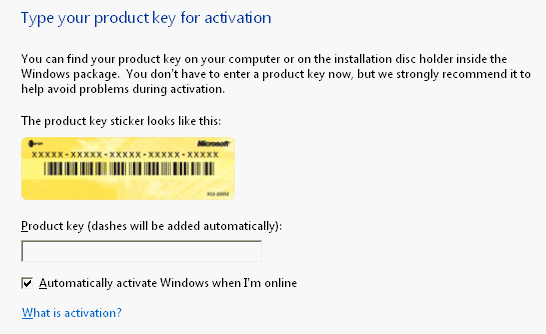
At the beginning of the setup procedure, the product key must be entered. The option Automatically activate Windows when I'm online is activated by default. Deactivate this option, if an immediate product activation is not desired after the internet connection has been established (for example if there is any doubt about the hardware compatibility, in that case Vista still can be installed on a different computer). The Windows Vista DVD makes it possible to install all versions; the definite version is determined by the used product key. If the screen with the requested product key has been skipped, the setup asks which Vista version should be installed. This procedure makes it possible to try one of the other versions for some time. Make sure you select the right version if Vista will be activated eventually.

 Enter the product code to activate Windows

At a certain point in the setup procedure, you are asked which partition to use for the Windows Vista installation. The C: partition is the most appropriate for this purpose. If there are no partitions yet, the hard disk needs to be partitioned first. To achieve this, click the link Drive options (advanced) to create new partitions. If you notice Windows Vista will be installed on a partition with a different disk letter (not C:), abort the setup and try again. This behavior happens after Windows is installed on a non-partitioned hard disk.

Creating a new User account

At the end of the setup, you are asked for a name for the user account (the password is optional). Only fill in one of the user accounts and setup this account as wished. Afterwards, the settings of the optimized account can be copied to a newly created account (Control Panel, User Accounts). At the first logon, an introduction screen (Welcome Center) is shown, which is also available through the Control Panel. Disable the introduction screen with the option Run at startup (at the left bottom of the screen), if the Welcome Center is no longer needed. The next step is to optimize the settings of the user account, like changing the settings of the desktop, start menu, quick launch en the sidebar. See also the page about setting up multiple user accounts.

http://www.optimizingpc.com/i/m/leeg.gif

Workaround for the limitations of a Vista Upgrade DVD

The installation procedure of a Windows Vista Upgrade-DVD has been changed in comparison to the former Windows upgrade procedures. During the upgrade procedure, the setup searches automatically for an activated and validated Windows XP-installation (this is not the case for theExpress Upgrade-DVD). Before you can proceed the setup of Windows Vista, the older Windows XP must be installed, activated and validated. A 'clean', installation is not possible anymore with the Windows Vista Upgrade-DVD following the standard procedure!

Fortunately, there is a workaround to achieve a clean installation. This is possible by running the setup of the Windows Vista Upgrade-DVD and installing Vista on an empty partition. Skip the question about the product key and deactivate the option Automatically activate Windows when I'm online in the following screen. Confirm that a product key is not necessary and select the bought Windows Vista version in the next screen. After the installation has been finished, the setup procedure must be run for the second time, but in this case by booting the DVD from within the newly installed Windows Vista. Choose for the Custom setup instead of an Upgrade setup and don’t forget to enter the product key when asked for. The files of the old installation are stored in the folder Windows.old that can be deleted afterwards.
http://www.optimizingpc.com/i/m/leeg.gif

http://www.optimizingpc.com/i/m/leeg.gif

What If the Hard Disk is not Recognised ?

During the setup procedure, you are asked on which partition to install Windows Vista. If there is no possible partition to choose from, possibly the hard disk is not recognized by Windows. The most common cause is a SATA controller or RAID configuration (a combination of two or more hard disks working together to achieve a faster and/or more reliable system) which isn’t supported by Windows yet. This problem can be solved by loading the missing drivers (at the moment when is asked for which partition to install Windows on) with the option Load Driver from disk, CD or USB memory stick. The hardware drivers needed for the controller are stored on the CD with drivers and software for the motherboard. For better support, download the newest drivers from the website of the motherboard manufacturer (see the page about installing     hardware drivers).
TIP: Some motherboards has a feature to load a SATA hard disk as an IDE hard disk. Search the BIOS settings for an option like Native SATA support/AHCI (Advanced Host Controller Interface), and disable it. Although this setting works fine, it is better to install the original drivers for the SATA controller afterwards followed by restoring this setting.
http://www.optimizingpc.com/i/m/leeg.gif

http://www.optimizingpc.com/i/m/leeg.gif

Private or Public Location Type

At some point during the Windows Vista setup, you are asked on what type of network the computer is attached to: Private or Public. If the computer is in a home or work situation, Private would be the most obvious options to choose. However, if the advantages of a network like sharing files and printers are not used at all, choosing for Public as location type is probably the best option to choose because this results in a better secured computer. The chosen option can be changed afterwards with the link Customize in the Network and Sharing Centre.
http://www.optimizingpc.com/i/m/leeg.gif

http://www.optimizingpc.com/i/m/leeg.gif

Delaying the Windows Vista Activation for 4 Months

Without product activation, Windows Vista can be used for 30 days, after this period the operating system switches to a modus with reduced functionality (RFM). The command SLMGR –rearm makes it possible to extend this period three times with 30 days. To achieve this, run the Command Prompt (Start menu, All Programs, Accessories) in administrator modus by right clicking on the shortcut and choosing for Run as administrator. Following this procedure, the allowed period can be maximized to four months. The command SLMGR shows the other options of the Windows Software Licensing Management Tool, like changing/removing the current product key and showing the current license information.
http://www.optimizingpc.com/i/m/leeg.gif

http://www.optimizingpc.com/i/m/leeg.gif

Classic View of the Control Pannel

The remaining part of this website assumes that the Controle Panel is used is Classic View (available in the left task pane of the Control Panel).
http://www.optimizingpc.com/i/m/leeg.gif

http://www.optimizingpc.com/i/m/leeg.gif

Changing the default Windows Explorer Settings

The system files are hidden by default, which is fine for less experienced users. However, some of the changes mentioned on this website assume that both system and hidden files are made visible. This is done by changing the following settings on the tab View (available through the button Organize of the Windows Explorer, Folder and Search Options, see the page optimized Windows Vista settings as well):

·         Enable the option Hide protected operating system files (Recommended).
·         Disable the option Hide extensions for known file types.
·         Enable the option Show hidden files and folders.
http://www.optimizingpc.com/i/m/leeg.gif

New in Windows Vista

Most software available for Windows XP still works fine with Windows Vista; in many cases even an upgrade is not necessary. This is possible because of the symbolic links (comparable to shortcuts, introduced in Windows Vista) used to redirect to another location. The XP based software searches for the default locations, which are used by in the Windows XP operating system. The symbolic links forward the requests automatically to the new default location within Windows Vista. In case of the folder Documents and Settings (used by Windows XP to store the documents and settings of the user accounts) has been replaced by the folders Users en ProgramData. The programs which still use the old storage locations will be redirected by the symbolic links to the new locations. Besides that, the setup of the register hasn’t changed that much in comparison to the earlier Windows versions. That’s why many programs still work fine under Windows Vista.

User Account Control (UAC)

Many programs would like to change the (system) settings, which is only possible when the user account has the right to do so (like an administrator account). With Windows Vista the security level of even the administrator accounts have been raised with User Account Control, which requests for confirmation of any (essential) changes, if requested at all. Some older software is not aware of this additional security layer, and produces strange errors as a result. In most cases, you have to find out by trial and error whether a program works without any problem under Windows Vista.

Because User Account Control (UAC) restricts the rights of any program, each program individually must receive additional administrator rights to make the necessary changes to the system. These additional rights can be given at the start of the program (or setup file) by right clicking the program file or shortcut, and to select Run as administrator. Permanent administrator rights are given by right clicking the shortcut and select Properties, tab Shortcut, button Advanced, and activate the option Run as administrator.

http://www.optimizingpc.com/i/m/leeg.gif

Windows Vista Ultimate supports multiple languages

The most expensive consumer version Windows Vista Ultimate, supports multiple languages. At setup, the default language is installed; the additional languages can be added through the Microsoft Update after the installation has been completed. After the language has been added, the language can be changed through Regional and Language Options (available in the Control Panel), tab Keyboard and Languages, option Choose a display language.