Windows 7

You can also visit my other blog at www.softknowledge.wordpress.com

Tips and Tricks

You can also visit my other blog at www.softknowledge.wordpress.com

How To(s)

You can also visit my other blog at www.softknowledge.wordpress.com

Downloads

You can also visit my other blog at www.softknowledge.wordpress.com

Wallpapers

You can also visit my other blog at www.softknowledge.wordpress.com

Quote of the Day

Sunday, March 27, 2011

Microsoft Word 2007 - Mailing Tab

Microsoft Word 2007 - Mailing Tab
 
Using the Mail Merge feature in Microsoft Word 2007, you can write a customized letter or flier to all your customers in one shot. Each letter has the same kind of information, yet the customer content is unique typically provided by a data source. The data source could be in many formats including text file, Microsoft Excel, Microsoft Access, SQL server 2008, Oracle, etc. Today we will look at the procedure of using mail merge in Microsoft Word 2007 with data from Microsoft Excel 2007. So let us go ahead and get started.

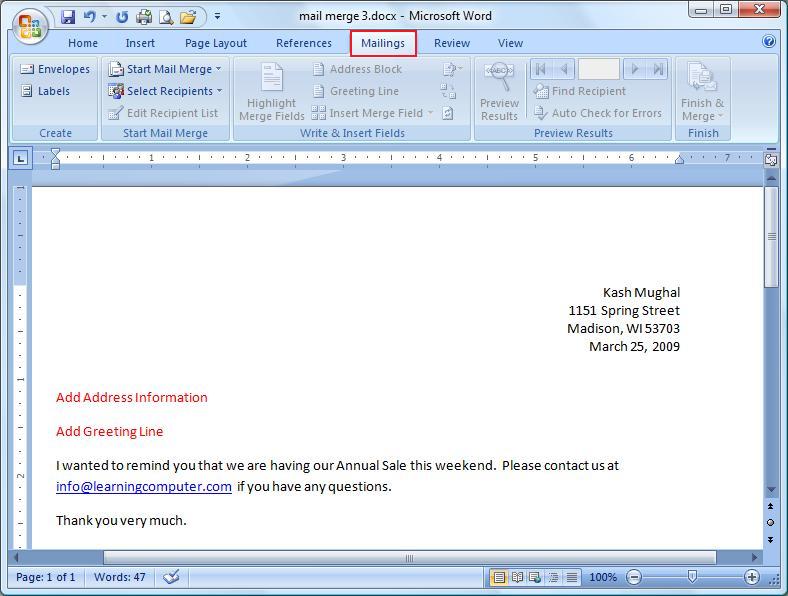
First of all browse to the Mailings Tab which can be found next to the Review Tab. When you click on it, you will see something similar to the screen shot below. In my case I have written a generic form letter that I will be sending to all of our customers. I've added my address information, the annual sale specifics and a few closing remarks. What I need to do is add unique customer information and a greeting line to the body of each letter.


Before I get started I also need the customer data from Microsoft Excel 2007. Right below is a screen shot of the data that I will be using for my mail merge example. Let us take a look at some of the mail merge fields; first name, last name, address information, etc. Also notice that the data resides in Sheet 1 of the Excel workbook.


Switch back to Microsoft Word. Go to the Start Mail Merge group under the Mailings Tab to start the mail merge process. Select Start Mail Merge command and then choose Step by Step Mail Merge Wizard. I would highly recommend using this option if you are new to mail merge. Here's what it looks like in my case.


This will launch the Mail Merge wizard which is a six step process. In the first step, you have to select what type of document will you be working with. I'm going to use the Letters option and then click Next. You can see the wizard on the right side of the document as shown below in the red rectangle.


In the next step you have to select which letter you will use for the mail merge. I'm just going to use my current letter that I started with and then click Next. There's a screen shot of what I'm talking about shown below.


In step three I have to select a data source for my customer list. For our demo, I am going to use a list from Microsoft Excel as was mentioned earlier. So I will choose Use an existing list and then click on Browse.


This will launch a new dialog box where I will find my customer data file in Documents folder. I will click on Customer Data.xlsx and then hit Open. This is shown in the figure below.


My customer data resides in Sheet 1$ so I will select that one and click OK. Also I will check First row of data check box. The dialog box shown below displays this information.


The mail merge wizard will parse the data, and bring up a list of all the possible mail merge recipients. In this list you can choose the customers that you would like to send the letter to. You can also sort and filter the data depending on your situation. I'm going to be using the default settings and just click OK.


When I did this, it took me back to my previous screen with one exception . Notice under the Use an existing list, you can see that it found Sheet1$ in Customer Data.xlsx. I will click on Next:Write your letter to move to the next step in the wizard.


In step four, I will be adding the address information and also a Greeting line block to my letter. Let us see how to do just that. In the screen shot below, I have highlighted in red were the address and greeting information needs to go. I'm going to select my insertion point in my letter (blue arrow) and then click on the Address block on the right side of my document.


This will bring up the Insert Address Block dialog box as shown below. In the Preview pane, I see that the actual street address is missing, not good. I need to fix this so I will click on Match fields command button.


This will take me to the Match fields dialog box where I can choose fields from the drop down for the place holders. I will select Street for Address 1 and then click OK. Here's a screen shot to display what I am talking about.


Notice that this inserted street address in the Preview pane. I can preview the information to make sure it looks good. Then I will click on OK.


In the screen shot below you will see that the wizard added an Address block in our document shown in a red rectangle. Next we need to add a greeting line, so I will choose Greeting line in the wizard on the right side and rerun my steps. This is highlighted by red rectangles in the figure below.


This will bring up the Greeting line dialog box. For the format I just need to use the first name, so I'll click on match feels again.


This will bring up the Insert Greeting line dialog box as shown below. I will go ahead and select the first name in the drop down and then click OK. You get the idea on how to customize the field selection and formatting within the mail merge wizard.


This time it added the greeting line to my letter. We still need to do one more thing before we can move onto the next step. We need to remove the Add address information and Add greeting line information that was part of the initial draft. So please go ahead and remove them. These are shown using a strikethrough below. Go ahead and click on Next to move on to Preview Letters.


Yahoo! we can actually see customer information and the greeting line in the next screen shot. This is exactly what we needed to achieve however font and showing up in red.


We must correct this before we can move on to the next step. I can just use the mini toolbar fix this problem. Here's what it looks like and then I clicked on Next: Complete the merge.


At this point we are done with our mail merge letter. You can either Print them or you can Edit individual letter. I will click on Edit individual letters to see what they look like.


This fires yet another dialog box with the heading on Merge to New Document. I will choose All for Merge records and hit OK as shown below.


I think we are all set at this point. If you look on the bottom left corner, you will notice that it is displaying Page 1 of the 100 letters that I need to send to my customers.


If you like this you can save this as a separate word document. This is shown in this screen shot below. I'm going to call this document customer mailings letters. Remember, you can always get back to these letters and print them at a later time if you like.

If you like you can Save this as a separate Word Document. This is shown in this screen shot below.


I'm going to call this document Customer Mailings Letters. Having a saved document is beneficial as you can always get back to these letters and print them at a later time if you like.


At this point we are done with our mail merge exercise. I did want to show you a few more features in the Mailings Tab so let us take a look at some of these quickly. Sometimes it is necessary to look at the fields (place holders) that you are using for mail merge in your document. You can highlight them by using Highlight Merge Fields command under the Write and Insert Fields Group. This is shown below in the screen shot.


What if you wanted to insert the last name in the greetings line? You can easily do this by selecting the Insert Merge Field command from the Write and Insert fields group. Here is what it looks like in action.


If you wanted to preview a certain customer, you can do this by using the Preview Results group. Let us say that we wanted to look at the tenth customer, we can easily use the navigation buttons to browse to that customer. This is shown in the figure below.


Friday, March 25, 2011

Microsoft Word 2007 - Reference Tab

Microsoft Word 2007 - Reference Tab
 
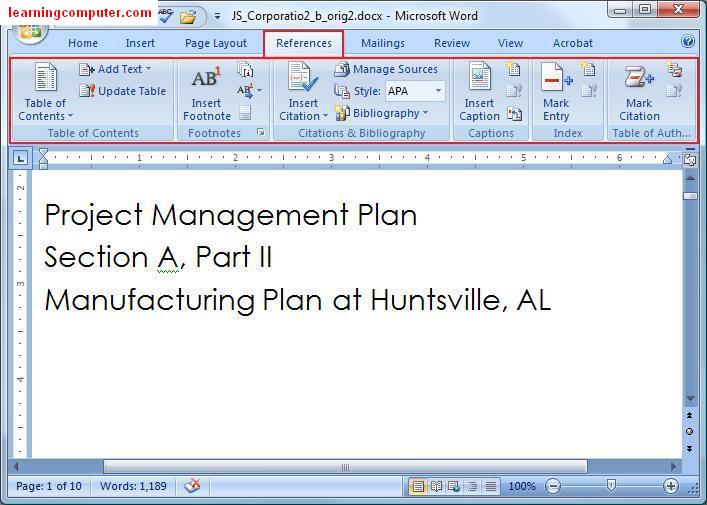
The References Tab on Microsoft Word 2007's new ribbon offers a quick way to enter your document sources, citations and choose a style like APA, MLA etc. On the References tab you will find things like Table of Contents, Footnotes, Citations & Bibliography, Table of Figures, Captions, Indexes and Table of Authorities.

Let us take a look at what the References Tab has to offer. Here is a screen shot of what it looks like.


In Microsoft Word 2007, creating a Table of Contents is really easy. One thing you need to make sure is that you type your document using one of the heading styles for the items that need to be included in the Table of Contents.

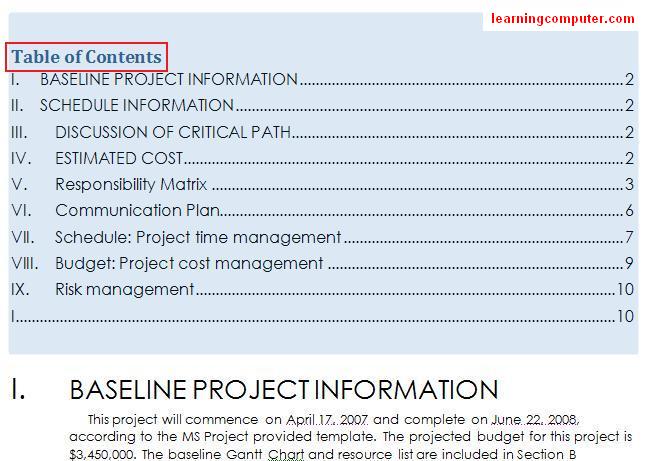
Let me show you this by example. For my project management plan report, I have created nine different sections with Headings. However I have not had the chance to create the Table of Contents just yet. I will do that next. Click on the Table of Contents command in Table of Contents group under the References tab, then click on the drop down button. It will give you built-in menu of options to choose from. From that list, choose automatic table 2.


After I went through the above mentioned steps, Microsoft Word 2007 generated a nice Table of Contents as shown below. Now when you need to browse to a specific section, all you need to do is Ctrl + click the section in Table of Contents and it will take you there directly.


Footnotes and endnotes are an easy way to direct the reader of your document to supplemental information generally located at the end of a page. You can insert the Footnotes and endnotes using the Footnotes group in the References Tab. This is illustrated below.


Let's say I want to add a footnote in my schedule information on Daw project plan report, something along the lines of an estimated completion date. I select my insertion point and right after section B and then click Insert Footnote. Word will add a 1 and then move the cursor to the end of the page. I then insert my necessary text and that's it, we just inserted a footnote to our page.

The screen shot will explain this, the small red rectangle is my insertion point and the large red rectangle has the actual footnote text.


When your document contains someone else's work, this typically needs to be cited for reference. Adding such references enables the readers to identify the source information. Using Microsoft word 2007, you can easily insert citations and references in your paper. Let us review the steps involved in this process next.

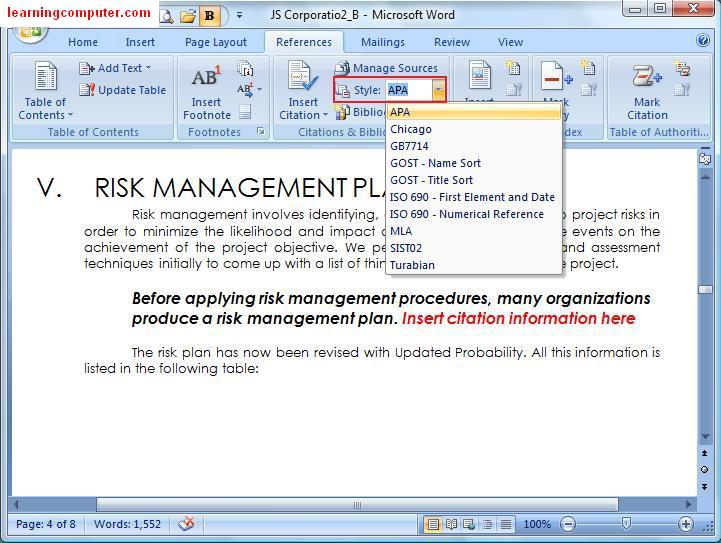
The first thing you need to do is select a standard style for formatting your references. You can do this by selecting the style command on the Citations and Bibliography group in Word 2007. When you click on the drop down, you will get a list of available styles.

We will choose APA for our citations as shown by the screen shot below.


We will be adding citations to the Risk Management Plan area. Notice in the screen shot above, I have added the quoted text in bold. I have also added the citation location indicated by red. Go ahead and select Insert Citation command and then choose add new source.

Here is what it looks like.


Microsoft word 2007 will launch the Create Source dialog box as shown below. This is where you will need to enter all the information regarding your citation. As you can see, I have entered the pertinent information including offer, title, publisher etc. Finally I hit OK to close the dialog box.


This will add an inline citation right next to the quote and also add the reference to the bibliography in our report. Notice in the screen capture below, we now see the author's name in addition to the year of the published book.


Next when I try to insert another citation and select the insert citation command, notice that the first citation is already included in the list. I can use this one again for a separate quote as highlighted in bold shown below.


I can also review all my sources by clicking on the Manage Sources command and go in the Citations and Bibliography group. You can organize the list of sources, sort them by different filters and modify them if you like.

Here is a screen shot of the Source Manager.


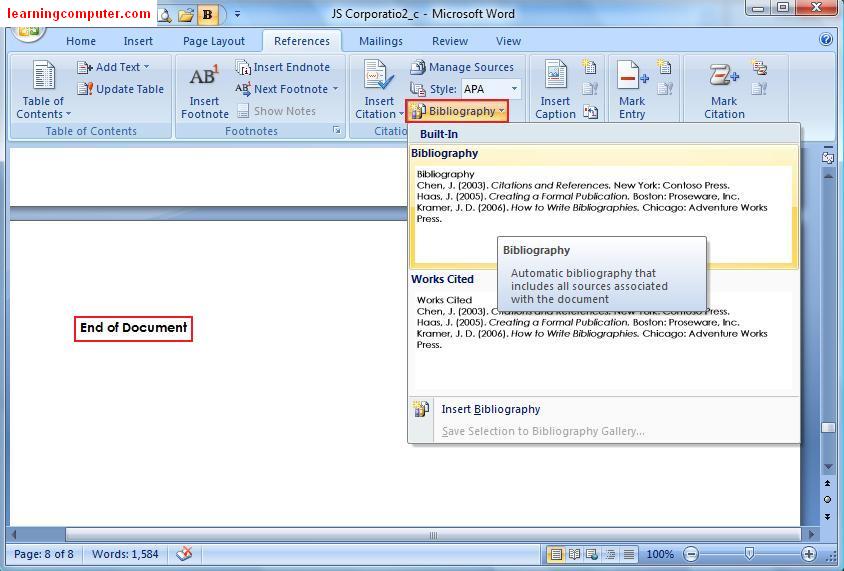
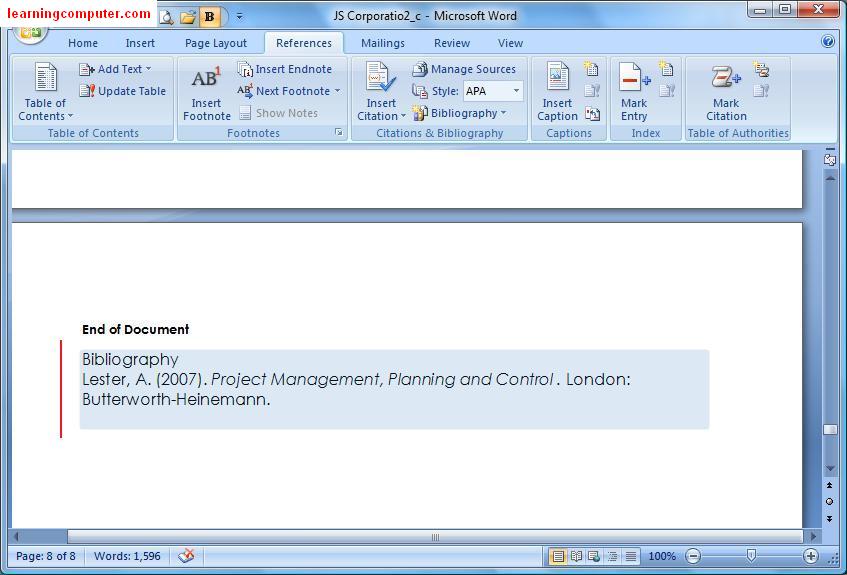
The last thing I need to do at this point is to add the bibliography at the end of my document. Let me show you how to do that. You can browse to the end of the document and select the insertion point. Next you need to select bibliography command as shown below. You will need to select one of the built-in choices from the drop down. Here we are selecting Bibliography.


This will go ahead and add a nice bibliography section to your document according to the style you picked. We have shown the bibliography section from our report in the figure below. Notice that it took care of formatting and the order in which the different items should appear, very cool indeed!


If your report has a lot of pictures or figures in it, it may be beneficial to have a Table of Figures in it. You can do this by simply inserting a caption which really is a pointer to the underlying object. My Project plan has at least two figures that I would like to be part of a Table of Figures. So how do I do that?

I select my first figure and then click on Insert caption command in the Captions group in the References Tab in Microsoft word 2007. Here is a screen shot of what I'm talking about.


When I did the above steps, I got the Caption dialog box. I went ahead and entered some more textual information for figure one. In this case I am calling it a Work Breakdown Structure (WBS) which is a project management term.

This is shown below.


I repeat the above steps for the next two figures in my project plan report, a Communications Plan and a Gantt chart. After I am done, I click on Insert Table of Figures command on Captions group.

This launches the Table of Figures dialog box as shown below. I am going to leave the default settings and click Ok.


This generated a professional looking Table of Figures section in my project planned report. From within the table of figures, I can simply choose the figure and then do Ctrl + Click to follow the link to the target object.

I have included a screen capture for your review.


You can also create an index using the Reference Tab. The index includes list of topics in your document along with the pages that they are on. You have to write the name and cross reference for your index. We have included a screen capture to show you how to insert an index.


Finally you can make a list of all the cases, statutes and authorities in your document. You can do this by inserting a table of authorities. Here is a screen shot of what it looks like.


Wednesday, March 23, 2011

Get Paid to Read Emails

Still Reading Commercial Emails For Free? 


Receive Emails On Topics That Interests You And Get Paid For It!
If you have access to your own email account, you can get paid. Refer others and get paid up to two levels.

Hits4Pay is one of very few highest paying advertising program in the industry.

Signup for free and receive $10 as a Free Reward:


Microsoft Word 2007 - Page Layout Tab

Microsoft Word 2007 - Page Layout Tab


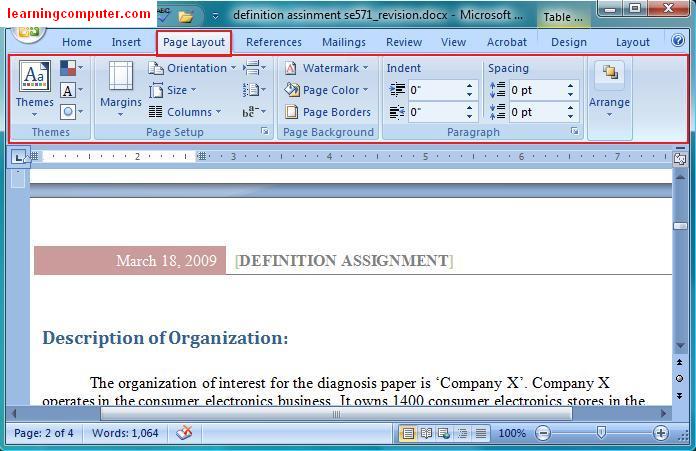
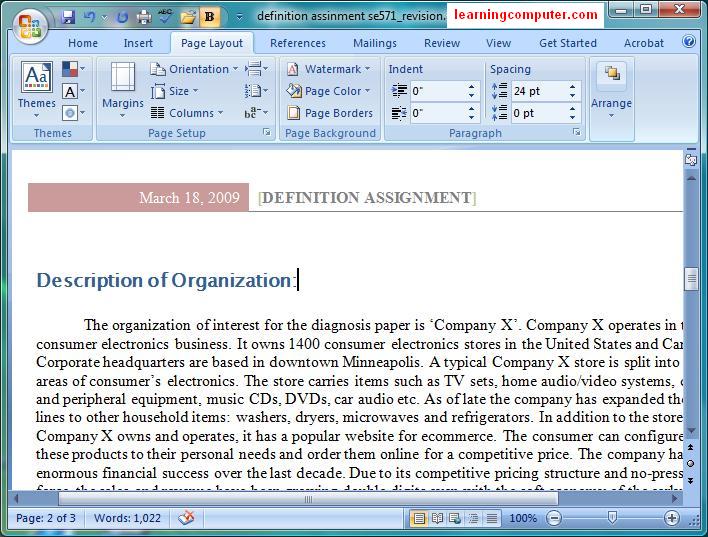
The Page Layout Tab lets you control the look and feel of your document in Microsoft Word 2007. You can apply a global design to your document by using one of the available themes and color schemes. You can also change the document orientation, page size, margins, indentation, line spacing and paragraph settings.

When you click on the Page Layout tab, this is similar to what you would see.


The first thing we are going to discuss is working with Themes. Themes are pre-defined and let you change the entire design using a combination of colors, font styles and formatting effects. Themes in Microsoft Word 2007 won't apply to the text if you don't have a style in place.

First you will need to use the Home tab to pick one of the Styles options. You can also click Change Styles and select a Style Set for the whole document. Since themes are set to work with the styles used in a document, you need to choose a style for all your headings, sub headings, and so forth.

Using this feature I was able to change my entire document to "Metro" theme. As I hovered over it, I was able to see a "Live Preview" on the right side. Note that the changes were only applied to the Header section and section headings. This is shown in the screen shot below:


The Theme did not affect my document text as it did not have a style applied to it. When I selected the heading, "Description of Organization" and browsed to the Home Tab, I did see that Heading 1 style had been applied to it.

This is shown as follows.


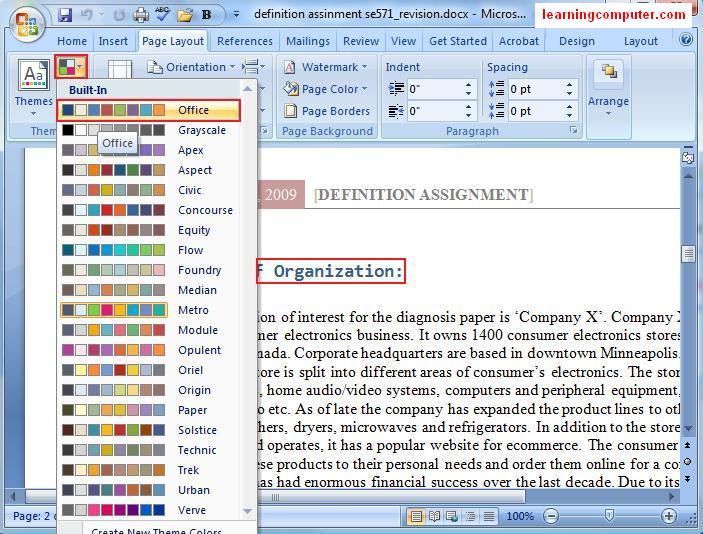
I don't know about you, but I am not a big fan of the bright green color for my headings. I can easily switch this by using the Built-In font colors under the Themes group. After you select this command, you will get a drop down list of several choices. I am going to select the Office color scheme which will switch the heading to blue. This is a fine color choice.

This step is shown in the screen capture below.


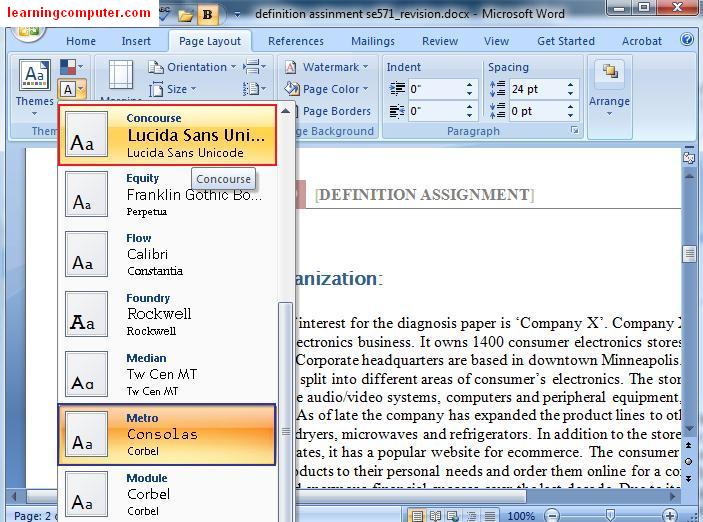
The last change I am going to make is to apply one of the Theme Fonts. This will leave the color scheme in place and just change the fonts. I will switch from Metro (blue rectangle) to Concourse (red rectangle) as shown in the next figure.


Next we will move on to the Page Setup group under the Page Layout Tab in Microsoft Word 2007. Using this tab, we can modify the structure layout of our document with details like margins, page size, orientation, line numbers etc.

I would like to modify the Definition Assignment document to use the Narrow margins instead of the Normal one. This will use more real estate on the page and trim 0.5 inch around all the borders. Here are the necessary steps shown by red rectangles.


When I did this, my document was updated using the Narrow margins. Here is the output from the action. I like the changes I have made so far so I will go ahead and Save the document. Like they say, "Save early, save often!"


Next what if you were trying to print address labels and needed to select a different paper size? No problem. From the Page setup group under the Page Layout tab, select Size and then Envelope #10. Caution: remember to feed the proper paper size in the Printer as well for this to work correctly in Microsoft Word 2007.

Here is a screen shot of what this should look like on your computer.


I really like this next feature. Currently I have a report that I am working on, but what if I was actually working on a newsletter or flier? In that case maybe I would want to split the text into two or more columns. Using the columns option in Page Setup group, you can do just that. Select Columns command and then choose Two.


After you have made the above selection, Microsoft Word 2007 will split the text in the report to two columns. It takes care of the formatting, margins, spacing and everything else automatically!!

The image below shows an output from this command of splitting a document into two columns.


Another common task is to use hyphens in your document. This conserves space and gives the document a more professional look. You can enable this automatically by using Hyphenation command under the Page Layout Tab.

A screen shot is as follows. Notice I have also shown you how to insert continuous line numbers here. This command is right above the Hyphenation button. This functionality could be useful if you are working on a legal document.


The hyphenation will split long words into two lines as shown below in the right colored rectangles


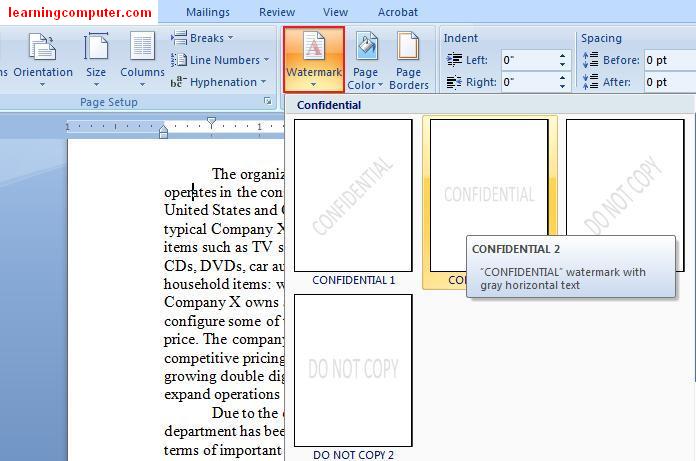
Let's move on to the next group, which is the Page Background. Here you can select Watermarks, Page Colors and Borders. For confidential or privacy type documents, you may want to use a Watermark. You can achieve this by selecting Watermark and picking one of the menu choices as shown below. Microsoft Word 2007 makes this a breeze by providing you Built-In options to do this task.


What if you wanted to add a little color to my document? You can select Page Color option under the Page Background group. How about bright Green, a little too bright I think!


The Page Layout Tab lets you also control indentation in your document. Indentation determines the distance of the paragraph from either the left or the right margin. I found a quotation in my document and this is a perfect candidate for indentation.

I am going to use 0.5 inch indent from the left and right side. Here is a screen shot of this action in red arrows.


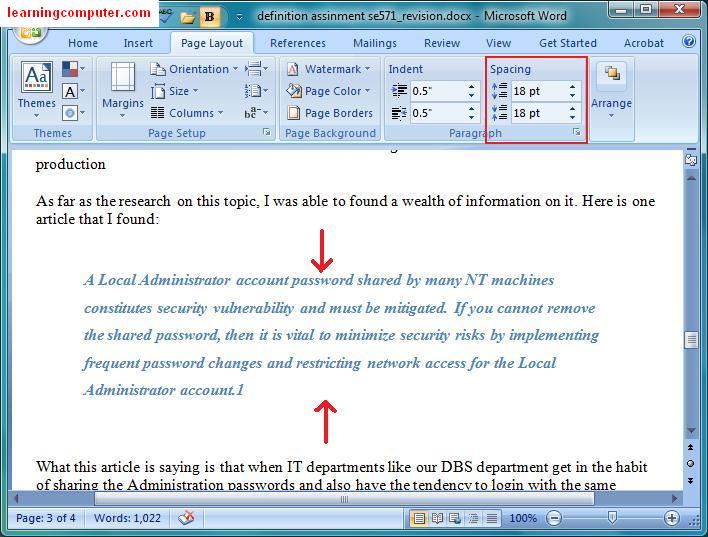
The last option I want to discuss is the Spacing before and after paragraphs. We will use the same text as the previous example. The quote seems to be a little too close to the regular document text. I would like to add 18 pt (point) spacing to the top and bottom of this quote. I can easily do this by using the Spacing option under the Paragraph group in Microsoft Word 2007.

Shown below in red arrows is the affect of making this change.