Windows 7

You can also visit my other blog at www.softknowledge.wordpress.com

Tips and Tricks

You can also visit my other blog at www.softknowledge.wordpress.com

How To(s)

You can also visit my other blog at www.softknowledge.wordpress.com

Downloads

You can also visit my other blog at www.softknowledge.wordpress.com

Wallpapers

You can also visit my other blog at www.softknowledge.wordpress.com

Quote of the Day

Wednesday, May 11, 2011

Word 2007 - Draft View

Word 2007 - Draft View

If you’re using either Word 2007 or 2010 and preferred working in the Normal view, then you’re probably wondering what happened to it.

I’m sure you’ve investigated the View tab of the Ribbon and this is what you found:


While on the surface it seems that they’ve done away with the Normal view, the truth is that they just renamed it. Try the Draft view.

Feeling better?

Yeah, I though you might.

Of course the happiness will be short-lived when you save a file in the Draft view and then find that later it opens in the Print Layout view again.

After you’ve changed the view of each document you open to Draft for a few days, you’ll be tired of it and wonder why they created the Draft view if Word wasn’t going to keep the setting when it’s opened again at a later time.

Well we can stop wondering about the whys and still not give up on having things presented to our liking…

Microsoft has included in the program options a place to tell Word whether or not you prefer to allow documents to open in the Draft view.

If you like that view then you’ll want to allow it, and here’s how you can make Word do just that.

Begin in the Office Button / File tab and choose Options.

In the Options dialog box choose the Advanced category on the left


On the right scroll all the way down to the General section.

Locate and select the “Allow opening a document in Draft view” option.

Click OK.

When you next open a file that you saved in Draft view it will still be in Draft view.

Monday, May 9, 2011

Web Browser Navigation

Shift+Space Web Browser Navigation

Sounds like a cool new form of space travel, doesn’t it? Unfortunately, (or fortunately, depending on how you look at it) it’s just a trick to make navigating pages in your web browser a little easier.

So, instead of using the Page Up and Page Down keys all the way on the other side of your keyboard, do this:

Press your Space Bar to go a page down.

Press Shift+Space to go a page up.


Quick navigation, without traveling all over the place! Give it a try!

Get Connected with me

Get Connected with me


Here are few links to get connected with me


My FaceBook Page : http://adf.ly/1TX5p

My Blog : http://adf.ly/1TX1w


My WOrdpress Blog (Softknowledge) : http://adf.ly/1TX45


Mallabhum ( My Business): http://adf.ly/1TX3E


Adf.ly : http://adf.ly/?id=457859

Wednesday, May 4, 2011

Firefox 4.0 Safe Mode

Firefox 4.0 Safe Mode

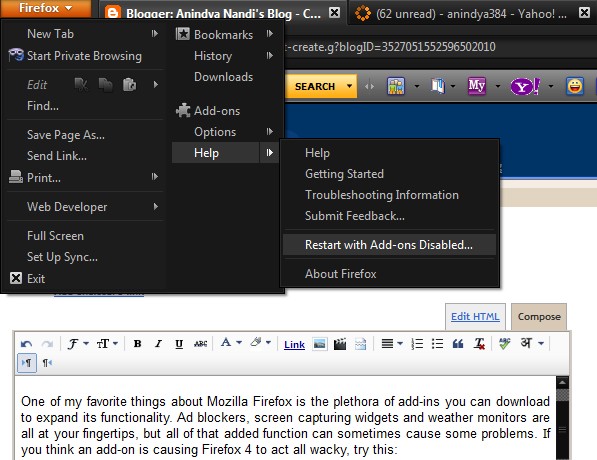
One of my favorite things about Mozilla Firefox is the plethora of add-ins you can download to expand its functionality. Ad blockers, screen capturing widgets and weather monitors are all at your fingertips, but all of that added function can sometimes cause some problems. If you think an add-on is causing Firefox 4 to act all wacky, try this:

Click the Firefox button and choose Help > Restart with Add-ons Disabled… .


Note: Make sure you’re clicking the little arrow next to Help, and not the button itself.

When the dialog box appears asking you if you want to disable add-ons pops up, click OK.


Now, before Firefox restarts another window will appear that gives you a list of options to fiddle with. Be extremely careful, because some of the options can have permanent effects (like deleting your bookmarks, as I painfully found out!). If you know what you’re doing, or have isolated the problem already, feel free to experiment, but for everyone else, click Continue in Safe Mode.


Firefox should then open up, uninhibited by any potential add-on problems, thus allowing you to carry on with your business until the add-on causing problems is fixed or removed.

Sunday, May 1, 2011

Successor of Windows 7 - Windows 8

Successor of Windows 7 - Windows 8


Windows 8 Milestone 1 is now available to download on torrents. Please note that this is not the Official version, its just a leak.

Developing of Windows 8 has jumped into a phase of Milestone 3. And Automatically led to even wave of new leaked screenshots of the system, which appear in the network and reveal newer features of the Windows 7 successor. In addition to the Aero Lite interface that was reveled before and now the website MSWin.me has published the pictures of the controls, which will go to lighter Aero theme of Windows 8.


Much more interesting feature that is included is the news about a module that is responsible for changing the language of the system. With this feature you are allowed to change language in Windows. Sources reveal the significant changes in the module. First Changing the language will be much simpler, and Microsoft company will enable this function at a fast location. Microsoft’s new window is expected in the next year. And the first beta version of Windows 8 is expected to be launched by end of this year.
 
Download Details (Search It from any torrent site and download)


File Name: 6.1.7850.0.winmain_win8m1.100922-1508_x86fre_client-enterprise_en-us.iso
Size: 2.45 GB (2,637,101,056 bytes)
SHA-1: DCA69DF6074BCA8B5DBA5C8D6D030D53CB6D82C
MD5: EA2DCFADA6BBA517A0A0649D15E1EB3D
CRC32: 32EB1881
 

Wednesday, April 27, 2011

Some Win Key Shortcuts for Windows 7 Users

Some Win Key Shortcuts for Windows 7 Users
 

Here are 11 beautiful shortcuts for Windows 7 users. Lets take a look: -
 
Win + Up Arrow – Maximize

Win + Down Arrow – Minimize

Win + Left Arrow – Snap to Left

Win + Right Arrow – Snap to Right (see a pattern here?)

Win + Home – Restore or minimize all other windows

Win + T – Press once to focus the first taskbar entry; press again to cycle through taskbar entries

Win + Space Bar (hold) – Peek at the desktop

Win + G – Bring gadgets forward to the top

Win + any number key (1-9) – Open a program on the taskbar. (The number corresponds to the pinned program’s location.)

Win + + (plug sign) – Zoom in

Win + - (minus sign) – Zoom Out

Friday, April 8, 2011

Microsoft Word 2007 - Review Tab

Microsoft Word 2007 - Review Tab

In Microsoft Word 2007, the Review Tab is useful in a lot of ways. You can have the Spelling and Grammar feature, the Research option, Thesaurus and Translation functionality to help you improve your documents. Here is what the Review Tab looks like.


Under the Proofing group, you can use find the Spelling and Grammar feature. You can easily check the spellings, punctuation errors and grammar using this tool. Here is the screen shot.


The first thing we are going to try is to check the spelling and grammar of a document. Go ahead and select the insertion point and click on spelling and grammar on the Proofing group on the Review Tab. This will start the Spelling and Grammar dialog box as shown below. Notice that it found an incorrectly spelled word, procedur. You can either click on Change if you would like to accept the suggestion made by Microsoft Word. Otherwise you can ignore it if you think the word is OK as it is.


Next we are going to try is the Research command on the word authentication as shown in the figure below. Select the word authentication and click on Research icon, this will launch the Dictionary feature as shown in the right side of the screen shot. It was able to find the word with the correct pronunciation and also the meaning for you to review. Very cool indeed!


Another related feature is the Thesaurus in Microsoft Word 2007. This amazing feature helps you find synonyms and also antonyms of any specific word. In our example it found a list of synonyms for authentication as shown on the right side in the figure below. I'm going to select certification and select insert. This helps if you are like me and use the same words over and over again.


In the next figure I have highlighted the Word Count feature. This lets you find the number of characters, paragraphs and lines in the document. This is a pretty useful feature if you are working on a term research paper where you have to stay within a certain number of words or pages.


If you are collaborating on a document with other team members or on a project report, the Comments feature in the Review tab in Microsoft Word 2007 can be a true lifesaver. In the following screen shot, I have added a comment that is shown in red. Notice that it used my initials and a number right before the actual comment. As the other team members and comments, the application will use different colors. This helps to keep all the comments organized from different authors.


Moving onto the next group section which is the Track changes group. We can easily manage additions, deletion, any comments and formatting changes in an efficient manner using this feature. You can find the Track Changes command under Tracking group in the Review Tab in Microsoft Word 2007.


Let us look at an example of this feature using a Course Syllabus sample. After the initial review, the changes are highlighted as shown below. The additions are in red and underlined, the deletions are in red and using a strike through. Furthermore notice that there is a vertical bar next to all the changes.


If you prefer seeing all the changes in Balloons, you can do this by selecting Show only Comments and Formatting in Balloons command. This will clean the document up and move the comments and changes to the right side in the markup area. The next two screen shots display the functionality of this feature.


If you would like to see all the changes in one place, you can use the Reviewing Pane command. In the image below, I have selected the Reviewing pane under the Tracking Group. Notice all the revisions are summarized on the left side of the document and broken down into insertions, deletions, etc. by the author and into different sections, very cool!


After all the changes have been reviewed and checked, we are ready to accept all the revisions. We can do just that by selecting Accept all Changes in Document under the Accept command in the Changes group under the Review tab in Microsoft Word 2007. This will go ahead and update the document then finalize all the revisions and changes.


As you can see the Review tab in Microsoft Word 2007 has a lot to offer us. OK at times, it is necessary to review different versions off the same document especially if there are several people working on it at the same time. In Microsoft Word 2007, this is just a breeze. You can also use the Compare feature to combine multiple versions of the same document.


Let us go ahead and see how this can be achieved. I'm going to compare two Course Syllabi that I have been working on for a class that I am teaching. I select the Compare command which launches a dialog box as shown below. I select the original document in the left side and the revised document on the right side and hit OK.


This will launch the wizard that will compare the two versions. Not only will it show all the differences between the two versions, but also display a summary on the left side as shown below and the screen shot.


The last thing I would like to show you is how to protect a document from editing. This option will restrict others from making certain types of editing or formatting changes to the document. You can select the Protect Document option under the Protect group. Here is the command shown on the ribbon in Microsoft Word 2007.


This will launch the Restrict Formatting and Editing dialog box as shown below. I will select the editing restrictions option that is number two and then click on us start forcing protection.


In the start enforcing production, I will select password, enter my password and click OK. There you go, now your document is protected by this password.


Next time someone tries to open this document and make changes, they will be prompted by this friendly on perfect document dialog box, pretty cool. A screen shot is as follows.


Tuesday, April 5, 2011

FaceBook Fun

FaceBook Fun
Facebook has all sorts of fun buried in its code, but this trick is one of my favorites. Today we're going to learn how to turn things upside down!

Here's how:


First, scroll all the way to the bottom of your Facebook page - you should see the copyright info, and whatever language your page is currently in. Click the language link.


In the resulting window you can choose whatever language you want your page to be in, but if you click the little arrow next to English...


...you get extra options to switch your language to Pirate English or even Upside Down English!


Click one to see your Facebook page in a whole new way - just remember to follow these same steps to change back when the fun is over!


Sunday, March 27, 2011

Microsoft Word 2007 - Mailing Tab

Microsoft Word 2007 - Mailing Tab
 
Using the Mail Merge feature in Microsoft Word 2007, you can write a customized letter or flier to all your customers in one shot. Each letter has the same kind of information, yet the customer content is unique typically provided by a data source. The data source could be in many formats including text file, Microsoft Excel, Microsoft Access, SQL server 2008, Oracle, etc. Today we will look at the procedure of using mail merge in Microsoft Word 2007 with data from Microsoft Excel 2007. So let us go ahead and get started.

First of all browse to the Mailings Tab which can be found next to the Review Tab. When you click on it, you will see something similar to the screen shot below. In my case I have written a generic form letter that I will be sending to all of our customers. I've added my address information, the annual sale specifics and a few closing remarks. What I need to do is add unique customer information and a greeting line to the body of each letter.


Before I get started I also need the customer data from Microsoft Excel 2007. Right below is a screen shot of the data that I will be using for my mail merge example. Let us take a look at some of the mail merge fields; first name, last name, address information, etc. Also notice that the data resides in Sheet 1 of the Excel workbook.


Switch back to Microsoft Word. Go to the Start Mail Merge group under the Mailings Tab to start the mail merge process. Select Start Mail Merge command and then choose Step by Step Mail Merge Wizard. I would highly recommend using this option if you are new to mail merge. Here's what it looks like in my case.


This will launch the Mail Merge wizard which is a six step process. In the first step, you have to select what type of document will you be working with. I'm going to use the Letters option and then click Next. You can see the wizard on the right side of the document as shown below in the red rectangle.


In the next step you have to select which letter you will use for the mail merge. I'm just going to use my current letter that I started with and then click Next. There's a screen shot of what I'm talking about shown below.


In step three I have to select a data source for my customer list. For our demo, I am going to use a list from Microsoft Excel as was mentioned earlier. So I will choose Use an existing list and then click on Browse.


This will launch a new dialog box where I will find my customer data file in Documents folder. I will click on Customer Data.xlsx and then hit Open. This is shown in the figure below.


My customer data resides in Sheet 1$ so I will select that one and click OK. Also I will check First row of data check box. The dialog box shown below displays this information.


The mail merge wizard will parse the data, and bring up a list of all the possible mail merge recipients. In this list you can choose the customers that you would like to send the letter to. You can also sort and filter the data depending on your situation. I'm going to be using the default settings and just click OK.


When I did this, it took me back to my previous screen with one exception . Notice under the Use an existing list, you can see that it found Sheet1$ in Customer Data.xlsx. I will click on Next:Write your letter to move to the next step in the wizard.


In step four, I will be adding the address information and also a Greeting line block to my letter. Let us see how to do just that. In the screen shot below, I have highlighted in red were the address and greeting information needs to go. I'm going to select my insertion point in my letter (blue arrow) and then click on the Address block on the right side of my document.


This will bring up the Insert Address Block dialog box as shown below. In the Preview pane, I see that the actual street address is missing, not good. I need to fix this so I will click on Match fields command button.


This will take me to the Match fields dialog box where I can choose fields from the drop down for the place holders. I will select Street for Address 1 and then click OK. Here's a screen shot to display what I am talking about.


Notice that this inserted street address in the Preview pane. I can preview the information to make sure it looks good. Then I will click on OK.


In the screen shot below you will see that the wizard added an Address block in our document shown in a red rectangle. Next we need to add a greeting line, so I will choose Greeting line in the wizard on the right side and rerun my steps. This is highlighted by red rectangles in the figure below.


This will bring up the Greeting line dialog box. For the format I just need to use the first name, so I'll click on match feels again.


This will bring up the Insert Greeting line dialog box as shown below. I will go ahead and select the first name in the drop down and then click OK. You get the idea on how to customize the field selection and formatting within the mail merge wizard.


This time it added the greeting line to my letter. We still need to do one more thing before we can move onto the next step. We need to remove the Add address information and Add greeting line information that was part of the initial draft. So please go ahead and remove them. These are shown using a strikethrough below. Go ahead and click on Next to move on to Preview Letters.


Yahoo! we can actually see customer information and the greeting line in the next screen shot. This is exactly what we needed to achieve however font and showing up in red.


We must correct this before we can move on to the next step. I can just use the mini toolbar fix this problem. Here's what it looks like and then I clicked on Next: Complete the merge.


At this point we are done with our mail merge letter. You can either Print them or you can Edit individual letter. I will click on Edit individual letters to see what they look like.


This fires yet another dialog box with the heading on Merge to New Document. I will choose All for Merge records and hit OK as shown below.


I think we are all set at this point. If you look on the bottom left corner, you will notice that it is displaying Page 1 of the 100 letters that I need to send to my customers.


If you like this you can save this as a separate word document. This is shown in this screen shot below. I'm going to call this document customer mailings letters. Remember, you can always get back to these letters and print them at a later time if you like.

If you like you can Save this as a separate Word Document. This is shown in this screen shot below.


I'm going to call this document Customer Mailings Letters. Having a saved document is beneficial as you can always get back to these letters and print them at a later time if you like.


At this point we are done with our mail merge exercise. I did want to show you a few more features in the Mailings Tab so let us take a look at some of these quickly. Sometimes it is necessary to look at the fields (place holders) that you are using for mail merge in your document. You can highlight them by using Highlight Merge Fields command under the Write and Insert Fields Group. This is shown below in the screen shot.


What if you wanted to insert the last name in the greetings line? You can easily do this by selecting the Insert Merge Field command from the Write and Insert fields group. Here is what it looks like in action.


If you wanted to preview a certain customer, you can do this by using the Preview Results group. Let us say that we wanted to look at the tenth customer, we can easily use the navigation buttons to browse to that customer. This is shown in the figure below.